Dreams, Randoms, and Comfort Food

Ok, I have to warn you upfront.  This will probably be one of the most random posts of my life, but that’s kind of where my brain is right now….all over the place!

Anyways, I had the STRANGEST dream this past weekend.  I dreamed that I had scored a job washing dishes for the Food Network.  Now, I need to be honest.  I HATE washing dishes….so much!  In fact, if I could land myself a boyfriend or a husband that I could cook for all the time, but they would wash every dish, I’d sign on the dotted line!  Anyway, I landed this job washing dishes in the Food Network kitchens.  It was totally sketchy though.  I could only come in after hours, and tackle the piles of dishes from the day.  Alone.  They would not allow me to interact with anyone, especially not any of the talent.  BUT, after the dishes were done, if I finished them with enough time left before the first person came in in the morning……I GOT TO COOK!!!! On ALL of their equipment, using their pantries and products!?!?!  WHAAAAAT? Seriously.  It was completely bizarre.  And completely stupid, because all of my cooking adventures only ended up making more dishes for me to wash…..I think the moral of the story with this one is, I need some new kitchen stuff.  Like cookie/baking sheets.  Mine are a disaster.  I mean, I cover them with either foil or parchment for EVERY single thing that gets baked on them……because they are SO BAD!  I would also kill for some donut pans, an immersion blender, and an ice cream maker.  Maybe with tax money……or maybe my parents are sharking this right now and need ideas for me COUGHbirthday coming up in MayCOUGH!

Wow, now that that is over…..I’ve been craving sweets like crazy lately.  This is very strange for me.  Pretty sure I’m doing some baking late in the week or this weekend and it’s going to take a personal triumph to not go face-first into the goodies!  Ugh…..sugar DEMONS!!!

Lately, I’ve been feeling off.  I’ve been fighting a battle with my voice.  It’s been going in and out for probably upwards of 6 weeks or so.  I hate it.  I’m kind of known for having this loud, bellowing voice that carries….I mean, I AM a Meister after all.  It’s one of our finest genetic gifts.  So this is severely cramping my style at school.  I don’t have anywhere near the power or pull in the hallways during passing period or in the cafeteria at breakfast duty.  I go to announce that it’s time to finish up and pick up all of your trash, and my voice squeaks or cuts out or breaks.  It’s completely embarrassing……..I guess I’m adopting one of the beautiful facets of puberty, again.  In addition to that, my legs are feeling like they have appropriately taken the beating I’ve given them over the past couple of days with workouts.  My quads are rocks….and my hamstrings are strung up super tight!  Why does all of this matter?  Because when I feel crummy, I want comfort food, which generally equates to warm and tomato-y.  Hence the reason I made Spaghetti Squash with Homemade Meatballs and Tomato Sauce tonight!  So as I sit here, sipping on some herbal tea, hoping and praying my voice comes back, I gift you this recipe.  I figure it’s the least I could do after having you sit through my rambling 🙂

PS:  This dish cooks best when rocking out to a Whitney Houston, “I Wanna Dance With Somebody” Pandora station in your kitchen.  Also, I would not recommend wearing a white shirt while cooking this…..because only idiots do that.  Note to self: find Bleach pen. Stat.

spaghetti and meatballs

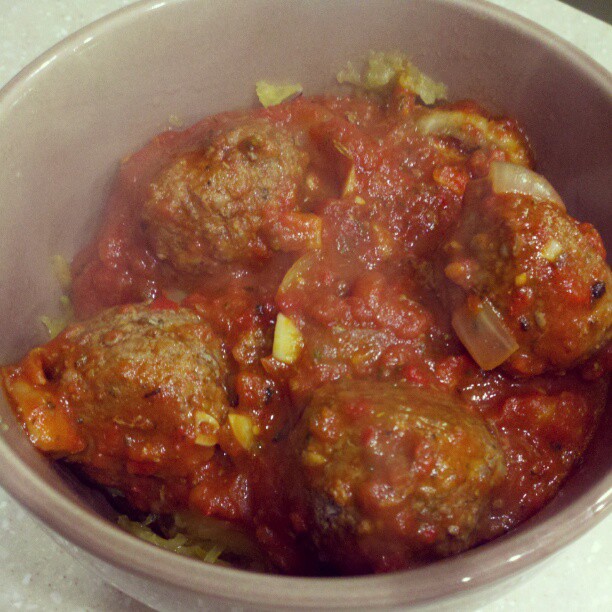
Spaghetti and Meatballs

  • 2 small or 1 large spaghetti squash
  • 1 pound ground beef
  • 2 red peppers, cored and cut into large chunks
  • 1 package of mushrooms (any variety works!)
  • 1 large yellow onion, 3/4 of it diced, 1/4 set aside
  • 8 cloves garlic, 4 minced, 4 left whole
  • 1 can diced tomatoes
  • 1 can tomato paste
  • 1 teaspoon cumin
  • 1 tablespoon dried parsley
  • 1 teaspoon dried oregano
  • Salt and Pepper to taste
  1. Preheat your oven to 425 degrees.
  2. Cut your spaghetti squash lengthwise and remove all seeds and inner strings with a spoon.
  3. Place cut side down on a baking sheet and put into your oven, bake for 30 minutes.
  4. Chop red peppers into large chunks. Drizzle with a bit of olive oil and sprinkle with salt and pepper.
  5. Arrange them on a small baking sheet and toss it in the oven with your squash for the last 20-25 ish minutes.
  6. While your veggies are roasting, get our your food processor! Gettin’ crazy!
  7. Toss in 1/4 of your onion (cut into a couple of chunks), 4 cloves of garlic, and about 1/3 of the package of mushrooms. Pulse until all of the veggies are teeny tiny pieces!
  8. In a large bowl, crumble your ground beef.  Add the pulverized veggie mix to the meat.  Add in the cumin, the parsley, and a bit of salt and pepper.
  9. Mix that shiz with your hands!  Get all sorts of dirty! Only mix until the veggies and spices are well incorporated into the meat.  Don’t go crazy on it. WASH YOUR HANDS!!
  10. Heat a bit (like 1 tablespoon) of oil in a deep skillet, keep it over medium high heat.
  11. Roll your mixture into balls, make them whatever size your heart desires.  I made mine about the size of a golfball, and I got about 16 delicious little beauties!
  12. Drop the meatballs into the oil and brown them on 2 sides.  It will take 3-4 minutes on each side.
  13. PAY ATTENTION to your roasting veggies!!!  Pull them out of the oven when they are done!!! But leave your oven on….it ain’t finished!
  14. Once meatballs have browned, remove them and place them on a baking sheet.  I used the SAME sheet my red peppers roasted on…..which are not on the baking sheet anymore, but waiting in the food processor to be pulsed into almost a paste.  Didn’t wash it or nothing!
  15. Put your sheet of meatballs into your 425 degree oven for about 10 minutes.
  16. While those are baking, we are going to build the sauce!!
  17. In the skillet, with drippings left behind by the meatballs, dump in your chopped onion, minced garlic cloves, and the remainder of your mushrooms.  Saute these veggies for about 5 minutes on high heat.
  18. Add in your red pepper puree.  Stir it all up!!
  19. Dump in your cans of diced tomatoes (juice and all) and tomato paste.  Also toss in your oregano.  At this point, turn your heat back to medium low.  Things will start bubbling and splattering pretty quickly if you don’t…..bad times.
  20. At this point, I filled the tomato paste can with water and added it to my sauce….to thin it out! Add as much as you want until it is the thickness you dig!
  21. When your meatballs are done baking, add them into your sauce and cover them with sauce.  Simmer on low heat for about 10 minutes.  It may be a good idea to slightly cover your pan with a lid….again, splatters are the devil!!
  22. When you can’t STAND it anymore, fork shred your spaghetti squash into “noodles” and top with your sauce and meatballs.
  23. SMASH and feel all warm and cozy inside!!

I realize this recipe takes a bit of time…..but trust me, it’s WORTH IT!  Not to mention, it makes leftovers that are even better than the original product…..I can’t wait to eat them for the rest of the week!  Here’s to crazy dreams, random ramblings, and really REALLY delicious eats! Comfort food love.

-Meister

Sunday ramblings and Kale Chips!

kale chips

Alright friends, I gotta be real about something.  Truth time.  I am going to throw away an entire waffle iron this morning.  It pissed me off one too many times.  There are few things in this world that irritate me more than malfunctioning kitchen equipment!  So the WHOLE iron (ruined waffle still inside) is going in the trash…as soon as it cools down enough to be handled.  That’ll teach you to destroy an epic waffle and smoke up my entire house!! Oh hell no, enjoy the trashcan.

This weekend has been kind of crazy.  Lots of stuff is going down, so I have just been trying to maintain the calm!  In an effort to do that, I haven’t gotten ANYTHING prepped for the week in terms of meal-planning or food, so it’s going to be an interesting afternoon for sure!  But this week should be GREAT in terms of recipes!  I’m trying out a couple of new things, as well as  making some old favorites.  Love it!

Quick recipe for you today!  Just my plain old kale chips.  They are highly addictive.  I have a serious problem with them, for REAL!  People always ask me how I store them so they don’t get all soggy.  Honestly, I couldn’t tell you how to store them….because I never have any to store.  Once I make them, addiction kicks into high gear and I go into BINGE mode on these poor little guys!  Eh, I suppose there are FAR worse things I could be addicted to…..like heroin, or meth.  THAT would be a real problem.

Kale Chips

  • 1 bunch or bag of kale (honestly, it doesn’t matter which kind you use, you want the curly stuff, buy the curly stuff.  You want dino kale, get the dino….your choice!)
  • 2 tablespoons olive oil
  • Salt, pepper, onion powder, garlic powder to taste
  1. Preheat oven to 350 degrees.
  2. Line 2 baking sheets with aluminum foil.
  3. Evenly spread kale onto your baking sheets.  Make sure you remove any thick stems at this point, they don’t get so delicious when they bake.  If using whole kale, tear the leaves into pieces.
  4. Drizzle with olive oil and toss on your spices.
  5. Get down and dirty and mix it all up using your hands.  Spread the kale into an even layer once all of it has been coated with the oil and spices.
  6. Bake for 10-20 minutes.  Start checking at 10 minutes and keep checking every couple of minutes until kale is crispy and starting to brown.  (Cooking time will depend on the thickness of the kale and how much you have crammed onto your baking sheet)
  7. Devour.  They are salty, crispy, and delicious!!

Enjoy these!  And seriously, I dare you to try and not eat the entire pan.  I DARE YOU!!! I’m betting it can’t be done….and if you CAN do it, you have a hell of a lot more willpower than I do!  Much love!

-Meister

Snowday (part 2) and Shrimp Scampi with Mashed Sweet Potatoes!

shrimp scampi

Well, Winter Storm Q delivered and the powers that be granted us another snow day!  Nothing like working a 2 day week, only to have it followed by a 2nd four day weekend in a row!  AND huge props to ME for staying tame with my eating today!  Seriously, I actually ate the foods I had prepped earlier in the week, whaaaat?!?  I’m pretty darn impressed with myself.  Plus, since I wasn’t eating random garbage all day, I’ve actually been pretty productive as well!  I got a TON of dishes washed, did some school work, got my laundry going, worked out, and shoveled my front steps and walkway.  Why didn’t I shovel the entire driveway, you ask?  Well that would be because little brother woke up at 5 AM and got the snowblower running!!!!  Then he cleared the whole driveway!  Today, he’s winning the award for best roommate ever.  I should be a nice landlord and bake him something….hmm, gonna have to think on that!

All of that being said, I’m completely OVER winter.  I want spring desperately.  I’m tired of nasty dry winter skin, chapped lips, having to wear socks and coats, and gross cold wind.  I want green, refreshing rain, thunderstorms, farmers markets, and SUN!!!  Seriously, I can’t wait.  The saving grace in all of this is that it is starting to stay lighter later into the day.  In fact, I generally feel better about life when I can walk out of the gym after my 4:30 workout and still see daylight!

Productivity aside, I can’t quite bring myself to cook dinner yet.  I’m still full from my awesome lunch.  I made homemade Paleo mayo, which is an exercise in patience.  Let me tell you!  You better be SUPER patient and completely in a calm place with your life or your general frantic aura will destroy that mayo, and quickly.  Mine turned out awesome…on the second batch.  I bumped the bowl on the first batch and accidentally poured in WAY too much oil at once!  So yeah, that was ruined.  But hey!  Even Meister makes mistakes, no big deal.  I just threw it away and started over.  My second attempt turned out perfectly!  So I used it to make some delicious tuna salad and baked up some kale chips to go with it!  I have an addiction to kale chips that cannot begin to be described.  I made 2 baking sheets of kale chips…..then ATE 2 baking sheets of kale chips.  I’m out of control.  Clearly.

The discussion of food addiction shall be saved for another day!  In the mean time, this recipe is a favorite of mine.  It is also a “go-to” for me because it is SUPER quick and easy to make.  The longest part is boiling the potatoes to mash them.  It’s stupid how easy this is….but it’s also STUPID delicious!  Enjoy!

Shrimp Scampi with Mashed Sweet Potatoes

For your potatoes:

  • 2 medium sweet potatoes, peeled and cubed into 1/2 inch chunks
  • 1/2 can full fat coconut milk
  • 1/2 teaspoon onion powder
  • 1/2 teaspoon garlic powder
  • Salt and Pepper to taste
  1. Place potatoes in a pot and fill with enough water to cover the potatoes.
  2. Bring potatoes to a boil.
  3. Boil for 15-20 minutes, or until they are fork tender.
  4. Drain your potatoes and put them back into your hot pot.
  5. Mash your potatoes.  Work out your aggression until they are completely mashed.  I like mine a little chunkier, so I don’t go too crazy on them!
  6. Mix in your coconut milk and spices until you get a creamy consistency.
  7. Set them aside to be topped by your delicious shrimp! (or stuff your face with them now….your call)

**If you are wanting to top these with the shrimp scampi, you can just leave the drained potatoes in the pot and hold off on mashing and mixing them until your shrimp is finished!  Just pop a lid on them and they will stay warmer.**

For the shrimp scampi:

  • 2 small yellow onions, thinly sliced
  • 1 large or 2 medium red bell peppers, thinly sliced
  • 3-5 cloves garlic, minced
  • 3/4 – 1 pound of raw, deveined tail-on shrimp
  • 1 teaspoon of red pepper flakes (more or less depending on spice level you want)
  • 1 spoonful ghee (or clarified butter)
  1. In a large skillet, heat 1 tablespoon of coconut oil.
  2. Add veggies (onions, garlic, and peppers) to your skillet and saute for about 5 minutes.
  3. While veggies are cooking, pull the tails off of your shrimp and set them aside. Be GENTLE!!  Don’t rip your shrimp to hell….that would be terrible.  Respect your protein!
  4. Add your spices and red pepper flakes to your veggies and cook for another 3-5 minutes. Or until veggies start to soften up a bit.
  5. Now, add your shrimp to your skillet and saute 3-5 minutes, being sure to turn your shrimp.  Cook until shrimp are pink and cooked through.
  6. Just for fun, when the shrimp are cooked, finished with a spoonful of ghee.  This is not a necessary step, but it will take the flavor to an outrageous level!!  And seriously, can it really be considered scampi without butter? I think not.
  7. Plate it up over some of those mashed sweet potatoes and enjoy!  Try to exercise some self control and not eat the entire pan…

Ok, just typing this up has made me hungry enough to start cooking dinner!  Thanks blog!! Much love.

-Meister


Snowday (part 1) and a delicious Egg Bake

wine and gatsby

Yes, I realize that pic isn’t anything to do with a delicious Egg Bake, but it is how I intend to spend the remainder of my afternoon after this post! Today marks Day 1 of Snowmageddon 2K13, also known as Winter Storm Q.  Honestly, I think it’s completely ridiculous that we are naming winter storms now, but we can’t even get an epic name?  Just a freaking letter?!?  I feel cheated.  We could have had Quentin, or Quincy, or Quin, but NOOOOO, just plain old Q.  Whatever.  So far, I’m not impressed.  It’s snowing pretty decently, so we’ll see how much mayhem this entire system decides to drop on us!

Remember a couple of days ago when I said that I eat like total CRAP on snow days?  And that if I prepared ahead of time, I was much better off?  HAHA!  Yeah…..guess who still has eaten like trash so far today?!  Oh well, what the hell.  I’ve actually done better than expected.  Met up with a couple of friends for brunch at a rad little diner where I had a pretty bangin’ bacon and veggie omelet with a side of bacon, because really, can you ever have too much bacon?  I think not.  I drank about a pot and a half of coffee and just generally enjoyed their company.  It was nice to get out and DO something on a snowday, considering the pavement was bone dry until about noon when it started snowing.

After brunch I ran a couple of errands, got back home, put my pj’s back on and started playing around in the kitchen!  Which is always a fun way for me to waste my time.  I don’t want to totally spill the beans quite yet, but let’s just say that there is a freaking ridiculously delicious waffle recipe in the works and will be coming your way VERY soon!!! Feel free to curse at me, but as I sit here typing this, I’m drinking a glass of wine (at 4 in the afternoon) and I’m looking forward to hanging on the couch and doing some reading this afternoon.  I love snowdays…..so FREAKING MUCH! I’m super sophisticated, wine and Gatsby.  I get extra pretentious points today!

Anyways, onto a recipe.  I usually make some sort of large quantity breakfast dish so that I can split it into individual portions to take with me throughout the week.  I decided to go the egg bake route this week, because I have kind of burned out on sweet potato hash.  So this dish was born!  This could really be made without any additional meat of any kind, but I wanted to add some extra protein…..hence the addition of some salmon!  If you couldn’t tell, presentation wise, this dish looks really pretty.  So if you’ve got a brunch where you need to impress or entertain, bust this one out!

tomato egg bake

Sundried Tomato Basil Egg Bake with Salmon

  • 1 small yellow onion, diced
  • 3-4 cloves of garlic, minced
  • 1/2 bag fresh baby spinach
  • 10-15 leaves of fresh basil, finely chopped
  • 8-10 sundried tomatoes, chopped (I used the jarred kind that are packed in olive oil)
  • 1 large tomato, cored and sliced into 1/4 inch thick slices
  • 6 eggs
  • 1/2 cup coconut milk
  • 1/4 tsp. baking soda
  • 1/2 tsp. cream of tartar
  • salt and pepper
  • 4-6 oz. of smoked salmon, or 1 can pink salmon (if you are adding meat in!)
  1. Preheat your oven to 400 degrees.
  2. Heat 1-2 tablespoons of olive oil in a large skillet.
  3. Add in your onions and garlic.  Saute until they are translucent. (big word!)
  4. Add in your spinach, one handful at a time, until it wilts down.
  5. When that is finished, transfer it to the bottom of your baking dish that’s been brushed with a bit of olive oil.  I used a weird sized glass baking dish I found in my cabinet….it’s like a 6″ X 10″ that was like 2″ deep.  You could use a square glass one as well and it would work just as great….you just might have to tweak the baking time.
  6. Spread the veggie mixture evenly in the bottom of your baking dish.
  7. If you are adding salmon, evenly distribute it over the veggies at this point.
  8. Next, layer on your sundried tomatoes and chopped basil.
  9. In a bowl, whisk together your eggs, coconut milk, baking soda, and cream of tartar.
  10. Pour your egg mixture over the entire dish of goodness! (Make sure you leave AT LEAST 1/2″ between the top of your eggs and the top of your baking dish, probably more if you can….otherwise you are in for overflow city.  In any case, I put a baking sheet on the rack under the dish while I’m baking it, just in case……nothing worse than cleaning an oven my friends!)
  11. Arrange your thinly sliced fresh tomatoes over the top of the dish.  Make them look all sorts of pretty!
  12. Sprinkle some salt and pepper on top of your tomatoes.
  13. Bake for 30-40 minutes.  Start checking at 30 minutes, keep baking until the middle no longer jiggles, even if that means it goes longer than 40 minutes. The time will depend on how deep your baking dish is.
  14. When finished baking, remove and let cool before you cut and serve.
  15. Enjoy!!!

This is a dish that can be enjoyed hot, cold, or room temp!  It’s delicious no matter what!  Feel free to play with additional proteins.  I just like the salmon because it really lets the tomatoes and basil shine through without overpowering them!

Time to get back to enjoying my snowday! Sending warm thoughts and food love your way!

-Meister

Imbalance in the Universe…demands Miracle Soup!

miracle soup

So, something is MAJORLY off today.  Honestly, ALL elements of my world seemed to just go to shit pretty quickly.  For example, work went pretty well, but the kiddos were just CRAZY because of all of the buzz about this impending DOOM SNOW! My performance at the gym was just off, everything was majorly uncomfortable and hurt like crazy….which is very strange.  So I was thinking, “Maybe I just need to get home and chill and all will set itself right.”

Wrong answer.  Had to hit up both Whole Foods and Trader Joe’s to grab a couple of things.  The saving grace in all of today is that I actually stuck to my list and didn’t blow an astronomical amount of money.  Anyway, got home, got the mail, and got my stuff inside…..where things quickly started to unravel.  Set my bags down on the counter, at which point my delicious ginger kombucha decided to explode!!  YAY!  This was followed by a great deal of swearing.  After that, I started cooking dinner, which lead to a grease splatter to my FACE and catching my finger with the peeler while peeling a sweet potato.  Seriously, the kitchen NEVER rebels against me.  Ever.  We are like BFF’s……this is how I KNOW something ain’t right with the world.  I’m blaming that meteor in Russia….

Oh!  And the kicker?  I got my “official” rejection letter from the Ph.D. program at A&M in the mail today.  I mean, I knew it wasn’t going to happen, my application was incomplete.  No big deal.  But to see the words, ” your overall profile is not competitive with other applicants” stings just a wee bit!  Especially when the day is already in the crapper.

So, I made the Miracle Soup, because this shit can cure anything.  ANYTHING I tell you!  From the plague, to the winter blues, to any kind of sickness imaginable, it’ll set you right.  I have GOT to trust and believe that this soup will set things on a better path!  Plus, I made it SUPER spicy tonight just to ensure that!  Anyways, the recipe below is the NON crazy spicy version, so no fear!

Miracle Soup

**Warning….this is kind of just “kitchen sink” soup….meaning NONE of the measurements are exact and I just kept grabbing stuff! It’ll turn out different every time, but it’ll turn out AWESOME each time too!  It also makes a TON, so use a big pot!**

  • 1 lb. ground Sausage
  • 2 Medium yellow onions, chopped
  • 2 anaheim peppers, chopped
  • 2 poblano peppers, chopped
  • 1 jalapeno, chopped very finely
  • 6-8 cloves of garlic, minced
  • 1 bunch kale (i used 1 whole bag of the pre-washed pre-cut stuff)
  • 1 LARGE sweet potato, peeled an diced into 1/2 inch cubes (like the size of your forearm, large…or a few smaller ones)
  • 1 can diced tomatoes
  • 2 quarts of homemade chicken stock (you can use boxed stock, but get the better quality organic stuff, not the cheap shit full of MSG and other junk)
  • Salt, Pepper to taste
  • 1/2 tsp of cumin for good measure!
  1. Start by browning your sausage in the bottom of a big soup pot. If you need to, start it in a bit of coconut or olive oil. When it is browned, remove it from the pot and set aside.
  2. Add all of your peppers, onions, and garlic and cook until translucent….or like 5 ish minutes, stirring often. When the veggies are cooked through, add back in your sausage…then get ready to start dumping in a BUNCH of stuff!
  3. Dump in your can of tomatoes and stir them into the mix.
  4. Then pour in your chicken stock.
  5. Add in your salt, pepper, and cumin and stir to combine.
  6. Let that come to a boil. DON’T watch it….it WILL take longer.
  7. When everything is boiling away nicely, add in your sweet potato chunks.
  8. Turn the heat back to a simmer and let it simmer away for another 10 minutes, until potatoes are fork tender.
  9. Add in your kale, one handful at a time, so that it can wilt down, until you’ve added the whole bunch/bag.
  10. Let it simmer away for another 5-10 minutes! Bowl it up and ENJOY!!!

    A couple of things:

    *If you end up needing to add more liquid, I would always opt for more stock. That being said, this makes a pretty chunky soup. But I like mine hearty. You do what makes you happy.

    *I have also played around with the HEAT level by adding additional jalapenos or by throwing in red pepper flakes. Again, you do what makes you happy and spice it up to your own level. I always err on the side of NOT super spicy……because you can always add some Red Hot to your own bowl!

Here’s to curing all of your demons!! (And hoping and praying I don’t spill my bowl of soup on this computer….) Much love.

-Meister


Rosemary and Sage Pork Tenderloin with Roasted Red Pepper Spaghetti Squash

Aren’t you impressed by the title ALONE on this!?!?  Especially coming from the gal who has shown no other talents than insanely delicious baked goods?  Seriously, cooking is my passion…and this happened.

For SERIOUS, it turned out so so SO good!!!  I should back up a bit and note that we are apparently going to be hit by some sort of insane Snowmaggeddon or Snowpocalypse or some equally terrifying word that includes the word snow, and it’s coming sometime around Thursday.  So, naturally, like any prepared single gal, I planned out some meals, went to the store, and stocked up…..on wine.  And some random veggies.  I’m totally set!  I also decided to start cooking like a fiend, because there is nothing I hate more than having to tackle my driveway (usually by shovel because my stupid snowblower refuses to work on any sort of regular basis) then come in and cook.  If I don’t have some sort of already prepared meals on snowdays, I end up living off of tortilla chips and salsa, raw pecans, and whatever protein I can scrounge up…usually some stray slices of bacon I find in a baggie in the bottom of my freezer.  Oh and coffee, lots and LOTS of coffee.  So I went ahead and got all productive!

As a side note, this recipe looks really complex.  It’s NOT.  I promise….it’s mostly just playing with getting the timing right.  Also, this meal is seriously date worthy.  It is freaking delicious and totally impressive.  Cook it up!  Enjoy it with your spouse, your partner, your significant other, or with yourself…..standing over the island in your kitchen, glass of wine in hand, singing really loudly along to this song.  I mean, it’s just a suggestion, I’ve never EVER done that…

Step 1: Marinate your Pork Tenderloin

  • 1 pork tenderloin (average size….not gonna lie, I got it from my mom, and she bought in bulk, so I have no idea how much it weighed…)
  • 2 tablespoons olive oil
  • 1 teaspoon onion powder
  • 1 teaspoon garlic powder
  • 1 teaspoon ground sage
  • 2 sprigs of fresh rosemary (remove the leaves from the stem, don’t worry about chopping them up, you will remove the bulk of them from the pork prior to cooking)
  1. Place all ingredients in a plastic bag and smush everything around.  Get it all good and coated.
  2. Let sit in the bag (I’d put it on a plate/shallow dish in case it leaks) in the refrigerator for at least 1 hour, the longer the better!

Step 2: Roasting your veggies

  • 1 large or 2 small spaghetti squash (cut lengthwise, seeds and inner strings removed)
  • 2 large red peppers (seeds removed and cut into large chunks)
  • 6-8 cloves of garlic (peeled)
  1. Preheat oven to 400 degrees.
  2. Place squash cut side down onto a baking sheet. Put into oven for 30-40 minutes, or until you push on the skin and it gives a little.
  3. Place red peppers and garlic cloves on another baking sheet.  Drizzle with a bit of olive oil and sprinkle with salt and pepper.  Mix them all up with your hands, get good and dirty!  Place in oven for 20-30 minutes or until they start to brown a bit on the bottoms.
  4. Did you notice that you can have both of these bad boys going at once?!?!  It gets better, just wait!
  5. Set the peppers aside for Step 4.
  6. When the spaghetti squash has cooled, grab a fork and get to forking.  No really, scrape at the insides with a fork and it should pull away from the skin in shreds that resemble spaghetti.  Be prepared to see those shreds flinging all over the place…and find them in random spots all over your counter.

Step 3: Cooking the pork!

  1. After marinating, remove pork from the bag.  At this point, you will want to remove as much of the rosemary as possible.  No one really likes biting down into an entire bit of rosemary….It gets kind of gross with your hands, but get after it!
  2. Place tenderloin into a shallow baking dish.
  3. Put into your 400 degree oven (right alongside your veggies if you have space and you want to!).
  4. Cook for 30-40 minutes, or until you hit 170 degrees using a meat thermometer (it depends on the thickness of your pork….hehe, gross.) Mine took about 35 minutes.
  5. LET IT REST WHEN YOU TAKE IT OUT!!!! For at least 10 minutes, otherwise you will cut into it and it will look like you have committed murder and your poor sad pork is the victim.  You WANT it to keep all of its juices, so be patient!!

Step 4: Making your Red Pepper sauce

  • Roasted peppers and garlic you made earlier
  • 1/2 teaspoon red pepper flakes
  • 1 teaspoon onion powder
  • salt and pepper to taste
  • 1 cup of liquid (chicken stock, water, wine…if that’s your thing, coconut water, etc.)
  • 1, 6 oz. can of tomato paste
  1. Place your peppers and garlic into a food processor. (I suppose you could also use a blender…) Pulse until smoothly blended.
  2. Add in spices and tomato paste, pulse to combine.
  3. Add in liquid and blend until the sauce is the consistency you desire.  I ended up putting in about a cup, and I used coconut water because I like the richness and touch of sweetness it added to the sauce. But live your life, do what you want!
  4. Transfer to a saucepan on medium/low heat and simmer for 15-20 minutes until it is warm and the flavors have had a chance to play!  Stir it once in a while, and you might want to put a lid over it (NOT tightly) just in case it gets to bubbling all crazy. Sauce splatter on my stove really REALLY irks me.

Step 5: Assembling your masterpiece

  1. Layer squash, then some sauce, then some sliced pork, then more sauce. Salt and Pepper to taste.
  2. Make it look pretty, if you are into that.
  3. Or just toss it all in a bowl and stir it up.
  4. SMASH and enjoy.  Seriously, I had to hide my leftovers so I didn’t eat ALL of it!

Don’t let the number of steps on this intimidate you.  You CAN do it, it’s actually really easy……just a lot of oven action.  Enjoy! Sending some Paleo food love that’s not in baked good form!

-Meister


Raising Money and Slingin’ Goods

SO MUCH AWESOME happened yesterday! My gym hosted a fundraiser for the families of the victims of Sandy Hook Elementary School, and I was extremely honored to be a part of it!  It was also the launch of my PaleoMeister line!!!  EEEEK!  So, I arrived very early in the morning to start slinging Paleo treats.  By the end of the day, I had sold ALL but 10 items, drank entirely too much coffee, watched some amazing folks participate in a throwdown workout, and spread my Paleo treat love to the masses 🙂  Oh, and we just happened to raise about $2,000 for an excellent cause.  No idea is ever too out there or too crazy…..in the words of Dr. Frank-N-Furter (Rocky Horror reference FTW!) “Don’t dream it, BE IT!”  Saturday morning was an idea put into reality.  Here are a couple of pics of me doing my thing:

sales

Me, getting real with my set up.  Come at me, and buy some treats!! Boom.

girls

How cute are these gals?!?  I mean seriously!!  And look how excited they are to be enjoying my treats!  Eating Paleo makes you (and your belly) happy.  It’s a fact.

noah Hanging with the best salesman in all the land, baby Noah!  Fairly certain his charm and general cute factor increased sales.

See!  I told you it was crazy exciting!  I ended up selling Chocolate Chunk Cookies, “Oreo” balls, and Maple Bacon Blondies…..which I’m gonna gift to you right now!  A word of warning, these are technically Paleo, but very much a treat…..and they are absolutely FREAKING out of this world amazing!!!!

blondies

Maple Bacon Blondies

These are a 3 step process: candying the bacon, baking the brownie, and smothering it in chocolate and candied bacon.

Step 1:  Candy your bacon

  • 1 lb. of thick cut uncured bacon
  • 1 tablespoon Grade B Maple Syrup

Preheat your oven to 350 degrees.  Cover a baking sheet with foil, and place a drying rack on top of the baking sheet.  Arrange the bacon slices on the drying rack and with a pastry brush, brush the bacon with maple syrup.  Bake for 30-40 minutes (this depends on the thickness of the bacon).  Start checking the bacon at about 25 minutes into baking.  Continue to check every 5 minutes until bacon is very crisp. Allow bacon to cool completely before chopping into small pieces.

Step 2: Making the Brownies

  • 1 cup coconut oil (melted)
  • 3/4 cup Grade B Maple Syrup
  • 1/4 cup Coconut Palm Sugar
  • 2 and 1/2 cups Almond Flour
  • 2 eggs
  • 2 teaspoons vanilla
  • 1 teaspoon salt
  • 1/2 teaspoon baking soda
  • 1 package Enjoy Life mini chips
  1. Preheat oven to 350 degrees.
  2. Brush a 9 x 13 METAL baking pan with some melted coconut oil.  You MUST use a metal pan for these….if you use glass, they will get destroyed when trying to get them out of the pan.  Sad day.
  3. In a large bowl, add melted coconut oil and coconut palm sugar.  Using a hand mixer, begin to blend together.
  4. Add in the maple syrup and continue mixing together until the ingredients come together.  It may take a couple of minutes to get the oil to incorporate fully with the syrup.
  5. Next, add in your eggs, vanilla, and salt.  Continue to blend until the eggs are totally mixed in.
  6. Slowly add in the almond flour and baking soda, mixing it in well until the batter is smooth.  It will still be a bit soupy, and that’s ok!
  7. Stir in your chocolate chips (set aside 1/4 cup of the chocolate chips to melt down for the topping later).
  8. Pour batter into pan and bake for 30-40 minutes or until toothpick comes out clean.  They will brown up.
  9. Allow to cool completely.

Step 3: Assembling your masterpiece

  1. When brownies have cooled completely you can begin this process, DON’T rush this!  It won’t all set up right if you start this while the brownies are still warm!
  2. In a small bowl, combine 1/4 cup of chocolate chips you set aside earlier with 1 teaspoon of coconut oil.  Microwave it in 30 second increments, stirring between each zapping session until chocolate is melted.
  3. Pour melted chocolate over the pan of brownies and spread into a thin layer covering the full pan.
  4. Sprinkle your chopped up candied bacon over the pan of brownies.  Be generous with this, you know you want to.
  5. Place the pan of brownies in the freezer for at least 15 minutes.
  6. When they are fully set and you are ready to cut them, run a sharp knife under very hot water before cutting….it will help you cut through the chocolate and not break it up!
  7. Remove them from the pan using a spatula.  They can be finnicky to get out, and just accept the fact that they first one out of the pan might get destroyed.  It happens, no big deal.
  8. These are super rich, so I would suggest cutting them into smaller brownies.  You could get 18-24 out of the pan.  If you are living large, cut it into 12 brownies and live it up!
  9. STUFF YOUR FACE WITH GOODNESS!

Hope you love these!  They made people VERY happy at the event on Saturday! Sending Paleo blondie love.

-Meister

Little Black Dress….AKA the Basic Chocolate Chunk Cookie

treats

As I was prepping all of the goodies for the giant Sandy Hook “Battle of the Sexes” fundraiser at the gym tomorrow I was thinking to myself, what should be the FIRST legit post?  I mean, this is a pretty big decision.  It’s a giant commitment!  It’s the first thing anyone who picks up a business card at the event, or sharks my Facebook, or Googles the name will see.  Gee, no pressure, right?!?  I had originally thought I would post the recipe for my Oreo Balls.  I had made promises to people that that particular recipe would be the launch recipe….and I SWEAR to you, it’s coming.  That being said, I’m not quite ready to part with that one yet…..they are kind of my pet project, my babies (that phrase just conjured a really bizarre mental image….and I’m sorry for that).

So then I got to thinking, what better to start with than a staple? Something for your arsenal.  Yeah, that’s the ticket!  Everyone has a chocolate chip cookie recipe.  EVERYONE!  Chances are, they are your grandma’s recipe from way back in the day…which most likely came from the back of a package of chocolate chips at some point along the line.  So what makes mine awesome? What makes mine so special?  Well, have you ever had a gluten-free chocolate chip cookie?  The majority of them that I’ve experienced are either rock hard or SUPER crumbly.  They are lacking that chewy mouth feel (eeeww….) that fresh baked cookies are supposed to have!

Naturally, I got to thinking….if GF chocolate chip cookies generally suck, there is NO WAY a Paleo version is going to suck any less, in fact, it’s probably going to suck a LOT more.  HOLY CRAP, I was wrong!!!  Which is very, VERY rare.  So these things should really be titled, “The best freaking chewy delicious Chocolate Chunk cookie you’ve ever had, you’ll never believe it’s Paleo!”….but that’s a bit of a mouthful.  So here it is!  Enjoy.

As a random sidenote, I’m really not that into sweets and desserts.  They generally make me feel kind of icky…..I would choose salt and crunch over sweets ANY day.  But the masses LOVE sweets! I like to make people happy, and most people respond much better to me gifting them treats of some sort than epic guacamole or side dishes. 🙂


Chocolate Chunk Cookies

  • 5 cups almond flour
  • 1 teaspoon sea salt
  • 1 teaspoon baking soda
  • 1 cup coconut oil (melted)
  • 2 tablespoons vanilla extract
  • 1 cup raw honey (warmed up so it pours/mixes easier)
  • 1 package Enjoy Life chocolate chunks (10 oz.)
  1. Combine dry ingredients (almond flour, salt, baking soda) in a large bowl.
  2. In a smaller bowl, stir together the wet ingredients (coconut oil, vanilla, honey).
  3. Mix the wet ingredients into the dry ingredients.  Get some elbow grease going!
  4. Refrigerate for at least 30 minutes. (This step can be skipped, but it is MUCH easier to form the dough if it stiffens up some)
  5. While dough is setting, preheat oven to 350 degrees.
  6. Roll dough into walnut size balls and flatten onto a baking sheet lined with parchment paper, placing them a couple of inches apart.  Do not flatten to less than 1/2 inch thick.
  7. Bake for about 10 minutes. (Depending on your oven/cookie sheets I would start with 8 minutes on the first batch and play with it from there. You want them to brown a little bit.)
  8. LET THEM COOL! Seriously, do it.  Let them cool…..otherwise you will burn your mouth and they will fall apart because they need a chance to REset.  I promise you, they will not get hard and crumbly if you let them sit….they stay chewy.
  9. Devour.  Try not to eat them all in one sitting….unless it’s one of those days, in which case, live your life!  I’m not gonna judge.

**This dough can be made a day or so in advance and can hang out in the fridge until you are ready to bake.  It is also REALLY awesome if eating cookie dough is your style since there are no raw eggs in the dough!  This recipe should make about 3 dozen cookies….but I’m never too sure, because I always end up eating some of the dough before it’s baked.  It’s pretty much a guessing game as to how many cookies actually come out of the oven!**

Every gal needs an amazing little black dress and a kick ass chocolate chip cookie recipe!  For real, consider this one yours!

-Meister

And so it begins!

If you are fortunate enough to have stumbled upon this page, my most sincere apologies!  As you can tell, it is NO where close to being ready for the general public.  Trust and believe, I’m working on creating something epic for you!  (Ok, maybe not epic, maybe downright boring…but it’ll be my best shot!)

Things to look forward to:

-Delicious Paleo recipes hatched from my somewhat crazy brain

-Mildly entertaining banter about my terribly mundane life

-Rambling, lots of rambling, and overuse of the ellipse…

I’ve totally got you wanting more, right?!?  Check back soon and hopefully this will be in a slightly lesser state of disarray.  Until then, go live your life!

-Meister