Soaking up the Summer! Roadtrips, Snack Food, and Insecurities!

Ok, so I know over and over again I have apologized at length about neglecting this bad boy.  Well, I’m done apologizing.  I realize I’ve taken quite the break from posting on here, but I’ve been very UNapologetically enjoying my summer and living life to the fullest!  I’m taking advantage of the precious few days/weeks that I have left before I go back to school and there’s nothing to feel sorry about in that!  If that irks you, meh, get over it!

As I sit here typing, I am waiting anxiously for morning to come so that I can embark on my roadtrip to Texas!  Some may think that it’s absolutely ludicrous to spend multiple hours in the car alone….I CAN’T FREAKING WAIT!  Sometimes it’s all dark and stormy for me to be alone in my own head on the open road, but I am in desperate need of this time to sort some stuff out!  Admittedly, I am really pretty apprehensive about being out of my own kitchen and my gym for almost two weeks.  But what the hell.  Life is about embracing the fear and giving it hell, right?  That’s what I’m telling myself at least!  Plus, I prepped some snacks for the road and packed ALL of my workout clothes as well as my jump rope and a kettle bell.  So really, I see that as preparing myself for success!

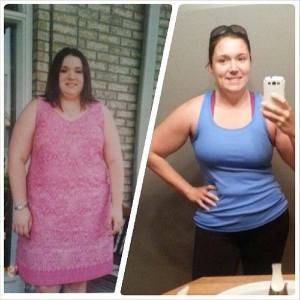
Before I get to food, I just need to say that my 10 year high school reunion was last weekend.  It was about as good as I expected it would be.  The hardest part of it for me was that I was THAT girl.  You know, the one that a ton of people had to second guess as to who it was.  I posted this picture on facebook on the morning of my reunion:

10 year change

The left side was taken on the morning of my high school graduation in May 2003 and the pic on the right was taken the morning of my 10 year reunion (July 2013).  It kind of set me back a bit looking at the comparison.  First, I guess I hadn’t realized I was that big by the end of high school, and secondly, I realized that I actually got quite a bit bigger before I started losing weight.  Anyway, this comparison photo was shared among several people and I got a ton of really positive comments on it.  Many of them somehow involving the word “inspiration”.  I have to admit that that particular word makes me really awkward.  I want my various passions to inspire people.  I want to inspire my students and those around me to continue their own education on whatever topics fascinate them.  I want my actions, purpose, and interactions with others to inspire those around to treat people better.  Yeah, I lost weight….a LOT of it.  And yes, I have done a complete 180 with my life, my choices, my social circles, my desires, and my needs.  To say that I’m humbled by people calling me an inspiration would be inadequate.  I don’t know, I’m probably just insecure.

Ok enough head case ranting.  I made some BOMB Banana Bread Granola for my trip tomorrow! Not gonna lie, the cooking time is gonna be a bit sketchy because my power went out towards the end of baking….so you might have to play around with the timing.  But the flavor is OUT OF CONTROL!! I swear, it tastes just like banana bread.

banana bread granola

Banana Bread Granola

  • 1.5 cups mixed nuts of choice, roughly chopped (I used pecans and cashews…it’s what I had on hand!)
  • 10-12 dates, pitted and roughly chopped
  • 1/2 cup shredded unsweetened coconut
  • 2 smallish very ripe bananas (I’m talking brown and spotty on the peel….that means they are SUPER sweet!)
  • 1/3 cup coconut oil, melted
  • 2 tablespoons maple syrup
  • 1 teaspoon vanilla
  • 2 teaspoons cinnamon
  • 1/2 teaspoon salt
  1. Heat up your oven to 325 degrees
  2. In a large bowl, mash bananas with a fork until they are almost pureed smooth.
  3. Add in your melted coconut oil, vanilla, cinnamon, maple syrup, and salt. Mix well to combine.
  4. Stir in your nuts, coconut, and dates….making sure you coat all dry ingredients well.  The dates will probably clump up together, just try to break them up as much as possible.
  5. Line a large baking sheet with parchment paper and spread out your granola mixture onto the baking sheet.  Make sure it is in an even layer, and spread pretty thinly., no more than 1/4 inch thick.
  6. Bake for 40 ish minutes, stirring the mixture halfway through.  You want to bake until the granola starts to brown a bit and has dried out some.
  7. Remove from the oven and LET IT COOL!!  It is the cooling that makes it all “crispy” and granola like!  Due to the “wet” nature of this mix, it may never crisp up completely.  But I found that I really kind of like the chewy texture of mine!
  8. Once it has cooled completely, I stored mine in an airtight container in the fridge.

Such a sweet and delicious paleo treat!  Can’t wait to smash on this in the car!!!  With that, realize it may be a bit until I post another full out entry, BUT be sure to follow me on FaceBook and I will be sure to post tasty food pics of what I’m smashing on during my travels! And while you’re at it, check yourself….be an inspiration for someone.  Do it! Peace, Love, and Paleo!

-Meister

Baking Queen

baking supplies

Hey friends!  So it’s been a crazy past few days!  Last week was full of prepping for my annual Luau at my house.  The party ended up being a giant success!  Lots of awesome people in attendance and TONS of great food!  I love hanging out with the folks from my gym, they are a stellar crew.  Pretty sure I drank my body weight in hard cider, but who cares!  It’s summer.  Live it up, I say!

This week is ALL about baking.  I’ve been prepping all week for The Duo competition on Saturday.  Because I’m going to have a booth set up, I’ve been doing LITERALLY nothing but baking every afternoon, evening, and night this week.  I’m kind of over it!  In my fridge right now are four pans of Maple Bacon Blondies, four pans of Chocolate Hazelnut Brownies, about 10 dozen Oreo Balls waiting to be dipped in chocolate, and enough Chocolate Chunk cookie dough for about 15 dozen cookies.

I can’t wait for Saturday to be here so that I can stock my fridge with REAL food again and get back into a regular eating schedule instead of eating random protein that is hiding in the back of my fridge.  So because of all of the baking, I have no recipe for you.  I suck at life.  I know.  My bad.  Again, it’s summer. Meh!  Make some desserts that I’ve linked up top.  If you haven’t tried them out before, get on it now!  OR better yet! Show up on Saturday and just buy the treats I’ve already made!  Do it.  It’s a Win-Win!

Well that’s all I’ve got for right now!  If you don’t hear from me for a few days, there’s a really good chance I’m in a sugar coma.  Somebody bring me a steak and some veggies…..

Until then, Peace, Love, and Paleo!

-Meister

Orange Pecan Cookies

orange pecan cookies

Apparently, I shouldn’t go on vacation.  Ever since I got back from Austin, I have been getting gradually sicker and sicker.  It sucks, pretty hardcore.  I finally caved and am taking the day off tomorrow, mostly to sleep…because I haven’t been doing any of that lately.

In other news, because of said sickness, I have watched several random movies this evening.  I NEVER just sit on my couch and watch movies, like ever.  I get all sorts of antsy, so I’m usually reading or working on some sort of project.  So naturally, I started baking these cookies tonight while watching movies.  I figured, hell, I pay for all of these channels, might as well watch some!  So far tonight, I’ve watched “Friends with Benefits” “Apollo 13” and now I’m watching “The Other Boleyn Girl”.  This movie is nuts!  Henry VIII was NUTS! But Eric Bana is pretty to look at….so this movie is watchable.

On a slightly sadder note, I think I’m gonna hang up my baking mitts for a while.  Starting Monday, I’m beginning what I’m dubbing the “Cancun Challenge”.  I’m 99% sure I’m going to Cancun in July and I want to look as amazing as possible in the swimsuit I just bought.  Therefore, starting Monday, I’ll be officially doing another Whole30…..which will actually be more like a Whole90.  No more paleo treats for me…..but have no fear, I’ll continue to bring you deliciousness.  It just means I’m going to have to rely heavily on taste testers!

Without further ado, here are these tasty little devils!

Orange Pecan Cookies with Orange Coconut Butter Drizzle

For the Cookies (makes about 5 dozen):

  • 5 cups almond flour
  • 1 teaspoon salt
  • 1 teaspoon baking soda
  • 3/4 cup coconut oil
  • 2 tablespoons vanilla
  • 3/4 cup raw honey
  • zest and juice (about 1/2 cup) from 2 oranges
  • 2 cups chopped pecans (I used dry roasted, unsalted ones)
  1. In a large bowl, mix together all dry ingredients.  Mix in your pecans with the dry mix!
  2. In a smaller bowl, mix together all of your wet ingredients, including the orange juice and the zest from both oranges. (Seriously, invest in a microplane or a zester, the are AWESOME!!)
  3. Mix your wet ingredients into your dry, combining thoroughly.
  4. At this point, I usually refrigerate the cookie dough for at least an hour.  This makes it WAY easier to roll later.
  5. When you are ready to bake your cookies, preheat your oven to 350 degrees.
  6. Roll your dough into walnut sized balls (about 1″) and slightly flatten them.
  7. Place them on a parchment paper lined baking sheet and bake for 7-10 minutes. I let mine go for just under 10 minutes and the were perfection!
  8. LET THEM COOL!!!  For real, let them cool for at least 30 minutes before you even think about putting the drizzle on them.  If you don’t want to top with the drizzle, feel free to smash on these bad boys as soon as they are cooled!

For the Orange Coconut Butter drizzle:

  • 3 tablespoons coconut butter
  • 1 tablespoon coconut oil
  • zest and juice of 1 orange
  • pinch of salt
  • small splash of vanilla (1/8 teaspoon for you measuring types)
  1. Put all ingredients in a small bowl.
  2. Microwave for about 30 seconds.
  3. Stir all together.
  4. Use a spoon to drizzle the mixture over the cookies all fancy like!  Or if you are feeling really fancy, you can make your own “pastry bag” out of a ziploc bag.  Load your drizzle goo into a baggie, seal it, and snip a small amount of the corner off.  Drizzle that deliciousness all over your cookies.
  5. STUFF your face!!

These are simply delightful!  I hope you enjoy them.  I’m trying my best to NOT eat all of them….please send strong willed thoughts my way as I embark on the Cancun Challenge!!  It’s gonna be really tough, especially because I also won’t be drinking….like at all.  Crazy.  I know.  Last time I did that I lost a whole bunch of my friends over it. Meh, oh well!  Sending delicious paleo treat love your way! Peace, Love, and Paleo!

-Meister

Laundry, Packing, and bars……GO time!

No, not the drinking kind of bars…although I’m pretty sure a few of those will be involved this weekend, but more like the fruit and nut kind of bars!  Perhaps even venture to call them “knock off” bars…..you know the ones I’m talking about!  Not gonna mention them here….I don’t need to go an get myself flagged, or worse, sued!  Oh the horror!!!  Ain’t NOBODY got time for that!  Anyway, I made these:

larabars

And they were freaking delicious!! So that’s the recipe you all will be granted this evening!

Before I get to that though, times are super exciting!  First of all, I am packing my suitcase (not really yet, but I will be in a little bit) gearing up to head to Austin, TX for a long weekend of Paleo LOVE!!!  Yep, I’m going to the PaleoFX conference. Go ahead and click on that link, find the speakers and schedule tabs and cream your little Paleo jeans.  I’m BEYOND excited!!!  I’m prepared to geek out pretty hardcore, good thing I’ve got my girl Missy with me to keep me in check and out of jail!!

In addition to the conference, Austin may be one of the greatest towns in ALL the land!  I’m pumped to be going back there.  One of my bestest buddies in the whole wide world lives there, and it’s been way too long since I’ve seen his face.  Throw in getting to meet up with one of my totally rad cousins and her BF, and I’m like a fat kid in a cupcake shop!!  Needless to say, this is the EXACT weekend I need before getting into the swing of State Testing at school.

Last bit of exciting news, I picked up these little beauties today!!!

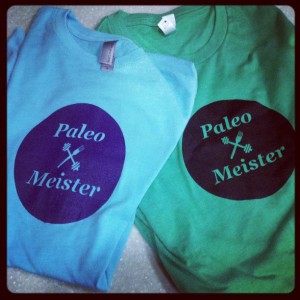
PM shirts

Yep, it’s legit!  I can’t wait to see people reppin’ these!!  Not to mention, the women’s cut ones are completely obnoxious….I mean baby blue/teal with purple screen printing?  I mean, who even suggests that?!?  Oh wait…. MAJOR thanks and props to the guys at Courtyard Ink!  They were totally amazing to work with and created some extremely quality work.  Much love guys, and you are definitely getting any of my business in the future!!

Anyways, enough blabbering!  The bars were super easy to make, did it all in the food processor!  In the future, I’m planning on adding some Paleo protein powder to these bad boys to make protein bars…..oh yeah, that’s happening.  Can’t freaking wait!

Salted Almond Fruit Bars….with a hint of Cocoa

  • 1 pound dates, pitted and chopped into chunks
  • 1/2 cup coconut oil
  • 1 tablespoon unsweetened cocoa powder
  • 1/2 cup unsweetened shredded coconut
  • 1/2 cup almonds, chopped (I used dry roasted ones….salted or unsalted, whatever you dig!)
  • 1/4 teaspoon salt
  • 1/2 teaspoon vanilla
  1. Add your chopped dates to your food processor and pulse until they become a paste.  They will clump into a giant ball, you will have to push it down multiple times….get used to it, you’ll have to do it on almost every single step during these!
  2. Add in your coconut oil, cocoa powder, salt, and vanilla.  Pulse until they are incorporated, again, pressing it down whenever it comes into a ball.
  3. Next add in your shredded coconut and your chopped almonds.  Again, pulse until they are all combined, pushing it down when needed.
  4. Line a square baking pan with parchment paper.  You will want to leave a little hanging over the edges so you can lift your bars out later.
  5. Using your hands (it’s honestly the easiest way….so get down and dirty!) press your mixture into an even layer in your pan.  You want to make sure they are pretty densely packed, mine ended up being about 1/2 inch thick.
  6. Toss that pan in the freezer for at least an hour, a couple if you’ve got the time.
  7. Lift your bars out and slice them to whatever size your heart desires.  I got 12 bars out of mine.
  8. Wrap individually in parchment paper and store in the fridge until you want to smash!

If you want them with more of a chocolate kick, add more cocoa!  Want to use a different nut, get after it!  Live your life.  With that, I’d better get on to actually packing!  I might post some randomness from Austin over the next couple of days, but nothing legit until next week…..most likely.  Please understand, k thanks!  Until then, peace, love, and PALEO y’all!

-Meister

Er-mah-GERD! Chocolate Hazelnut Pie!

chocolate hazelnut pie

For REAL!?!?  I’m not even kidding with this pie when I say that my dad is convinced this could be served in a fine dining establishment.  He will eat almost anything I make, but this one topped his list as “I would NEVER EVEN GUESS this is Paleo!!!”  That made my heart happy…..especially when he said he needed an entire pie, not just the one slice I took him.  I’ve been caught saying that this is the recipe that is gonna land me a husband someday.  It’s completely OUT OF CONTROL!  In fact, I can hear the leftovers whispering to me right now from my fridge.  Not even lying when I say that I’m really, REALLY glad I’ve got myself to a better place in my life….because the old me would have eaten this entire pie with a bottle of wine for dinner and wallowed about how crappy things are.  Not saying that won’t happen at some point this weekend, but STILL!  The fact that there is pie in the fridge at this point is a massive triumph!

Today is the last official day of my Spring Break.  I’m somewhat sad.  I did absolutely nothing, and that was great, but I feel like I also haven’t accomplished much. Eh, gearing up for Austin I guess!  Plus, getting back into the routine of waking up early is not going to be fun!  Oh, and it’s snowing today.  What the HELL, Nebraska?  Get your act together!  I’m beyond over this weather!  I’m counting down the days until I leave for Austin, TX next week.  Which I’m completely STOKED for!  I know I’ve said it before, but seriously, I can’t freaking wait!!

Really not looking forward to Open Workout 13.3, mostly because I hate wallballs.  In fact, hate doesn’t even begin to cover it.  I really like having the ability to walk, especially up and down the stairs……I’m already having nightmares of what my legs will be like after I finish that workout.  It’ll be like my first 2 weeks of CrossFit all over again…….going down the stairs backwards, drowning my quads in Icy Hot, and needing to use the handicapped stall for the sheer purpose of having the grab bars if I need them.  No joke.

Alright, enough of my whining.  On to pie!  This recipe takes a bit of love, but in the end it’s really pretty easy.  I mean, you make the entire thing in the food processor….what could be easier than that??

Chocolate Hazelnut Pie

  • 1 bag Enjoy Life chocolate chunks, split in half
  • 1 cup hazelnuts (I used dry roasted, unsalted from Trader Joe’s….they have a good price!)
  • 1/4 cup coconut flour (plus a bit more to dust your pie pan)
  • 3/4 cup raw honey
  • 1/4 cup hot water (like almost boiling)
  • 4 eggs
  • 1/2 cup coconut oil (not melted)
  • 2 teaspoons vanilla
  • 1/2 teaspoon cinnamon
  • 1/2 teaspoon salt
  1. Preheat your oven to 350 degrees, and make sure you have a rack in the bottom 1/3 of your oven.  It seems weird, but this bad boy needs to cook near the bottom.
  2. In your food processor, place half of your chocolate chunks, your hazelnuts, and 1/4 cup of coconut flour.  Pulse until you get small chunks.  You don’t want them to get too small….this is what gives your pie some crunch.  I would pulse until all pieces are about the same size. Dump this into a separate bowl.
  3. In your now empty processor bowl, add in the rest of your chocolate chunks and your raw honey.  Pulse this until they come together.
  4. While the processor is running on low, slowly add in your hot water and keep blending until all of the chocolate has melted.
  5. Remove the lid and add in your salt, cinnamon, vanilla, coconut oil, and eggs.
  6. Pulse a few times so that it all incorporates.
  7. Now, add back in your chocolate chunk, hazelnut, coconut flour mixture.
  8. Pulse a few times to combine everything.  Not too much though, you don’t want to break your chunks and nuts into smaller pieces.
  9. Pour your batter into a 9 inch pie pan that has been brushed with coconut oil, and dusted completely with coconut flour.  It will almost completely fill the pan, don’t worry!  (I have not tried this in glass, so I would stick to a metal pie pan….I make to guarantees with it baking the same/coming out cleanly with a glass pie plate)
  10. Bake for 35 minutes in the bottom 1/3 of your oven at 350 degrees.
  11. Remove from the oven at 35 minutes, no matter what.  It may not look done in the middle, that is FINE.  It may have risen strangely, that is FINE!  It will all settle itself out, don’t worry!!
  12. Let cool on the counter for an hour.
  13. Refrigerate for at least 2 hours, overnight is great too!
  14. Remove from the fridge about 30 minutes prior to serving!
  15. Top with paleo whipped cream and SMASH!!!

I topped mine with a few fresh blackberries, because I’m currently obsessed with those!  No berry is same in my house…..Not even lying, plan to share this with friends and family, or be prepared to hide it from yourself.  It’s INSANE!! Peace, Love, and Paleo y’all!

-Meister

Weekend love and Chocolate Pudding

crazy socks

Check out my socks!!  Aren’t they obnoxious?  I love them…. I went into the gym this morning, with a goal in mind for my performance on the 13.2 workout.  I walked out of the gym having smashed that goal….by almost another full round.  Looking back, I think I could’ve pushed myself harder and finished out round 6, but I’m not displeased with my performance this morning!  I’m actually pretty proud!  So naturally, I went to grab food with some folks from the gym…..duh!  I had a crazy delicious gluten-free cinnamon roll and some insane corned beef hash.  SO GOOD!  Not paleo, sue me.  I’d earned it though!  So now I’m just kicking it, on my couch, letting my belly and my body recover from this morning!

Exciting news in the world of PaleoMeister…….I put my first shirt order in this morning!  Can’t wait for people to be sporting my gear!!  I think it automatically just makes you sexier, but I might be a wee bit biased.  Regardless, I can NOT say thanks enough to the folks that ordered a shirt.  It truly means so much to me that you believe in either me or what I’m doing enough to rep my brand.  HECK YES!  Ooooh!  Also, my 25 pound box of almond flour showed up on my doorstep yesterday.  Can’t freaking WAIT to get started into that bad boy!!!  It is taking up a major portion of my freezer and fridge right now….seriously, I need to invest in a chest freezer.  And yes, I realize that it totally looks like I’m slangin’ drugs…..soooooo funny!  That, my friends, is six, yes SIX gallon sized bags full, plus my regular container that stays in my fridge…..it’s insane!!

almond flour

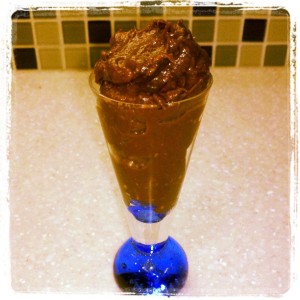
This past week, I’ve been MAJORLY craving sugar and Thursday I finally caved and made some avocado pumpkin pudding.  It was STUPID delicious.  I promise, it looks absolutely disgusting, but it is ridiculous…..try it!  Don’t let the name or the thought of flavor combos scare you.  I promise you won’t be disappointed!!  SEE!!  It looks (and tastes) magical!

avo pudding

Avocado Pumpkin Pudding

  • 2-3 ripe avocados, seeded and cut into small pieces.  You want to use SOFT ones so they blend better, so get the ones that are really ripe (I used 2.5 avos, because that’s what I had around my kitchen)
  • 1/2 cup pumpkin puree
  • 1/4 cup almond butter (or sunbutter)
  • 4-5 tablespoons raw honey (depending on how sweet you like it)
  • 4 tablespoons unsweetened cocoa powder (more if you want it more chocolate-y)
  • 1/2 teaspoon cinnamon
  • 1 teaspoon salt

***You can do this either in a large mixing bowl, or in a food processor.  If you want it really smooth, I’d use the food processor.  Just dump all ingredients in the processor and blend until smooth, scraping down the sides a few times.  If you are cool with it having some texture and still having some bits of avocado, use the bowl.  I used the bowl.***

  1. In a large mixing bowl, smash your avocados until they are a smooth paste.
  2. Stir in your pumpkin and almond butter.
  3. Add in your honey and cocoa powder.
  4. Sprinkle in your salt and cinnamon.
  5. Taste it.  If you want it a little sweeter, add some more honey.  More chocolate-y?  Add in more cocoa powder.  Just be sure to add it slowly and mix well with each addition.
  6. Let it sit in the fridge for an hour to let the flavors really come together.
  7. Smash!  And then hide the remainder in the the back of the fridge so you don’t eat it all in one sitting.  Seriously, I’ve done it.  It’s insanely good!!!

I really hope you like this as much as I do!  If you can get past the fact that you are eating avocados and chocolate, it’s crazy good.  I was a pudding fiend in my former life, so this is a REALLY good fix for me!  Be looking for another chocolate treat in the next couple of days!!  I’ve got a terrible sweet tooth, due to that magical week of the month…..so I’m trying out a Chocolate Hazelnut pie recipe for tomorrow.  Eek!! Sending chocolate sugar craving love your way!!

-Meister

Raising Money and Slingin’ Goods

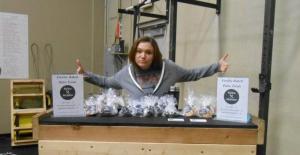
SO MUCH AWESOME happened yesterday! My gym hosted a fundraiser for the families of the victims of Sandy Hook Elementary School, and I was extremely honored to be a part of it!  It was also the launch of my PaleoMeister line!!!  EEEEK!  So, I arrived very early in the morning to start slinging Paleo treats.  By the end of the day, I had sold ALL but 10 items, drank entirely too much coffee, watched some amazing folks participate in a throwdown workout, and spread my Paleo treat love to the masses 🙂  Oh, and we just happened to raise about $2,000 for an excellent cause.  No idea is ever too out there or too crazy…..in the words of Dr. Frank-N-Furter (Rocky Horror reference FTW!) “Don’t dream it, BE IT!”  Saturday morning was an idea put into reality.  Here are a couple of pics of me doing my thing:

sales

Me, getting real with my set up.  Come at me, and buy some treats!! Boom.

girls

How cute are these gals?!?  I mean seriously!!  And look how excited they are to be enjoying my treats!  Eating Paleo makes you (and your belly) happy.  It’s a fact.

noah Hanging with the best salesman in all the land, baby Noah!  Fairly certain his charm and general cute factor increased sales.

See!  I told you it was crazy exciting!  I ended up selling Chocolate Chunk Cookies, “Oreo” balls, and Maple Bacon Blondies…..which I’m gonna gift to you right now!  A word of warning, these are technically Paleo, but very much a treat…..and they are absolutely FREAKING out of this world amazing!!!!

blondies

Maple Bacon Blondies

These are a 3 step process: candying the bacon, baking the brownie, and smothering it in chocolate and candied bacon.

Step 1:  Candy your bacon

  • 1 lb. of thick cut uncured bacon
  • 1 tablespoon Grade B Maple Syrup

Preheat your oven to 350 degrees.  Cover a baking sheet with foil, and place a drying rack on top of the baking sheet.  Arrange the bacon slices on the drying rack and with a pastry brush, brush the bacon with maple syrup.  Bake for 30-40 minutes (this depends on the thickness of the bacon).  Start checking the bacon at about 25 minutes into baking.  Continue to check every 5 minutes until bacon is very crisp. Allow bacon to cool completely before chopping into small pieces.

Step 2: Making the Brownies

  • 1 cup coconut oil (melted)
  • 3/4 cup Grade B Maple Syrup
  • 1/4 cup Coconut Palm Sugar
  • 2 and 1/2 cups Almond Flour
  • 2 eggs
  • 2 teaspoons vanilla
  • 1 teaspoon salt
  • 1/2 teaspoon baking soda
  • 1 package Enjoy Life mini chips
  1. Preheat oven to 350 degrees.
  2. Brush a 9 x 13 METAL baking pan with some melted coconut oil.  You MUST use a metal pan for these….if you use glass, they will get destroyed when trying to get them out of the pan.  Sad day.
  3. In a large bowl, add melted coconut oil and coconut palm sugar.  Using a hand mixer, begin to blend together.
  4. Add in the maple syrup and continue mixing together until the ingredients come together.  It may take a couple of minutes to get the oil to incorporate fully with the syrup.
  5. Next, add in your eggs, vanilla, and salt.  Continue to blend until the eggs are totally mixed in.
  6. Slowly add in the almond flour and baking soda, mixing it in well until the batter is smooth.  It will still be a bit soupy, and that’s ok!
  7. Stir in your chocolate chips (set aside 1/4 cup of the chocolate chips to melt down for the topping later).
  8. Pour batter into pan and bake for 30-40 minutes or until toothpick comes out clean.  They will brown up.
  9. Allow to cool completely.

Step 3: Assembling your masterpiece

  1. When brownies have cooled completely you can begin this process, DON’T rush this!  It won’t all set up right if you start this while the brownies are still warm!
  2. In a small bowl, combine 1/4 cup of chocolate chips you set aside earlier with 1 teaspoon of coconut oil.  Microwave it in 30 second increments, stirring between each zapping session until chocolate is melted.
  3. Pour melted chocolate over the pan of brownies and spread into a thin layer covering the full pan.
  4. Sprinkle your chopped up candied bacon over the pan of brownies.  Be generous with this, you know you want to.
  5. Place the pan of brownies in the freezer for at least 15 minutes.
  6. When they are fully set and you are ready to cut them, run a sharp knife under very hot water before cutting….it will help you cut through the chocolate and not break it up!
  7. Remove them from the pan using a spatula.  They can be finnicky to get out, and just accept the fact that they first one out of the pan might get destroyed.  It happens, no big deal.
  8. These are super rich, so I would suggest cutting them into smaller brownies.  You could get 18-24 out of the pan.  If you are living large, cut it into 12 brownies and live it up!
  9. STUFF YOUR FACE WITH GOODNESS!

Hope you love these!  They made people VERY happy at the event on Saturday! Sending Paleo blondie love.

-Meister

Little Black Dress….AKA the Basic Chocolate Chunk Cookie

treats

As I was prepping all of the goodies for the giant Sandy Hook “Battle of the Sexes” fundraiser at the gym tomorrow I was thinking to myself, what should be the FIRST legit post?  I mean, this is a pretty big decision.  It’s a giant commitment!  It’s the first thing anyone who picks up a business card at the event, or sharks my Facebook, or Googles the name will see.  Gee, no pressure, right?!?  I had originally thought I would post the recipe for my Oreo Balls.  I had made promises to people that that particular recipe would be the launch recipe….and I SWEAR to you, it’s coming.  That being said, I’m not quite ready to part with that one yet…..they are kind of my pet project, my babies (that phrase just conjured a really bizarre mental image….and I’m sorry for that).

So then I got to thinking, what better to start with than a staple? Something for your arsenal.  Yeah, that’s the ticket!  Everyone has a chocolate chip cookie recipe.  EVERYONE!  Chances are, they are your grandma’s recipe from way back in the day…which most likely came from the back of a package of chocolate chips at some point along the line.  So what makes mine awesome? What makes mine so special?  Well, have you ever had a gluten-free chocolate chip cookie?  The majority of them that I’ve experienced are either rock hard or SUPER crumbly.  They are lacking that chewy mouth feel (eeeww….) that fresh baked cookies are supposed to have!

Naturally, I got to thinking….if GF chocolate chip cookies generally suck, there is NO WAY a Paleo version is going to suck any less, in fact, it’s probably going to suck a LOT more.  HOLY CRAP, I was wrong!!!  Which is very, VERY rare.  So these things should really be titled, “The best freaking chewy delicious Chocolate Chunk cookie you’ve ever had, you’ll never believe it’s Paleo!”….but that’s a bit of a mouthful.  So here it is!  Enjoy.

As a random sidenote, I’m really not that into sweets and desserts.  They generally make me feel kind of icky…..I would choose salt and crunch over sweets ANY day.  But the masses LOVE sweets! I like to make people happy, and most people respond much better to me gifting them treats of some sort than epic guacamole or side dishes. 🙂


Chocolate Chunk Cookies

  • 5 cups almond flour
  • 1 teaspoon sea salt
  • 1 teaspoon baking soda
  • 1 cup coconut oil (melted)
  • 2 tablespoons vanilla extract
  • 1 cup raw honey (warmed up so it pours/mixes easier)
  • 1 package Enjoy Life chocolate chunks (10 oz.)
  1. Combine dry ingredients (almond flour, salt, baking soda) in a large bowl.
  2. In a smaller bowl, stir together the wet ingredients (coconut oil, vanilla, honey).
  3. Mix the wet ingredients into the dry ingredients.  Get some elbow grease going!
  4. Refrigerate for at least 30 minutes. (This step can be skipped, but it is MUCH easier to form the dough if it stiffens up some)
  5. While dough is setting, preheat oven to 350 degrees.
  6. Roll dough into walnut size balls and flatten onto a baking sheet lined with parchment paper, placing them a couple of inches apart.  Do not flatten to less than 1/2 inch thick.
  7. Bake for about 10 minutes. (Depending on your oven/cookie sheets I would start with 8 minutes on the first batch and play with it from there. You want them to brown a little bit.)
  8. LET THEM COOL! Seriously, do it.  Let them cool…..otherwise you will burn your mouth and they will fall apart because they need a chance to REset.  I promise you, they will not get hard and crumbly if you let them sit….they stay chewy.
  9. Devour.  Try not to eat them all in one sitting….unless it’s one of those days, in which case, live your life!  I’m not gonna judge.

**This dough can be made a day or so in advance and can hang out in the fridge until you are ready to bake.  It is also REALLY awesome if eating cookie dough is your style since there are no raw eggs in the dough!  This recipe should make about 3 dozen cookies….but I’m never too sure, because I always end up eating some of the dough before it’s baked.  It’s pretty much a guessing game as to how many cookies actually come out of the oven!**

Every gal needs an amazing little black dress and a kick ass chocolate chip cookie recipe!  For real, consider this one yours!

-Meister