Summer time….and the living is EASY!

Hey friends!  Well, I’ve officially somewhat settled into my summer “schedule”.  Honestly, it’s really difficult to stay on track with my eating when I have little to no structure or routine.  I’ve actually been pretty proud of myself so far this year.  I’ve been keeping myself to a regular gym schedule which makes everything else about 10 million times easier!  That being said, I’m still drinking a lot more that I’m used to.  I’m by no means getting inappropriate, but I had all but eliminated my “glass of wine with dinner” mentality…..and now that’s back.  Cider on the deck? Sure! Wine while cooking dinner? Yep! Rum buckets at the College World Series? Hell yes!  So yeah, alcohol is back in the mix.  She’s a tricky tricky devil….and makes me feel squishy.  What a dirty bitch.  Eh, I suppose I do it to myself!


I’ve also really been trying to be more spontaneous and go out more.  I became a bit of a recluse over the winter/spring months, and now that it’s summer and there is a TON going on, I’m trying to take FULL advantage of it!  Living life! Because of this, I feel like unless I have food already prepped in my fridge, I’m screwed.  Such is life.  I’ve been just making sure there is some sort of protein in my fridge at all times.  It’s veggies that I’m struggling with making sure I have enough of.  Stupid vegetables and their short shelf life…..


A few days back, I promised you something spectacular with that Dill Mayo I made.  Well here it is!  This turned out so insanely delicious.  I just kept it in the big bowl that I mixed it in and I stashed it in my fridge and ate off of it for almost a week.  Hell yes. Easy access!

potato salad

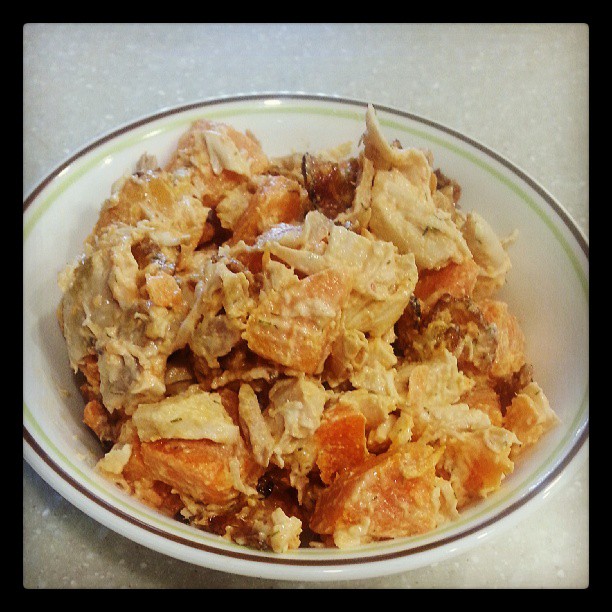
Buffalo Chicken Potato Salad….with BACON!

  • 1.5 pounds cooked chicken, chopped into bite size pieces (I used a cooked rotisserie chicken that I just picked clean!)
  • 1 pound bacon
  • 2 pounds sweet potatoes, diced into 1/2 inch cubes
  • 2-3 tablespoons hot sauce of choice (I used Frank’s….and I used way more than that amount, because I LOVE hot sauce!)
  • 1/4 – 1/2 cup Dill Mayo…..depending on how saucy you like your salads
  • Salt and pepper to taste
  1. In a large pot, put in all sweet potato chunks and cover with water.  Bring to a boil, and lightly boil for 15ish minutes.  You want your potatoes to be tender enough that a fork will poke into them, but not so over done that they smush and fall apart. When cooked, drain potatoes and put aside to cool.
  2. While potatoes are boiling, cut bacon into small pieces and cook in a deep skillet until bacon is fully cooked and crisp. (Feel free to bake/microwave your bacon as well and then just cut it into chunks….didn’t want to heat up the whole kitchen with my oven!) When bacon is crisp, remove it from the skillet onto a paper towel to get some of the excess fat off.
  3. In a large mixing bowl, combine pulled chicken, cooled potatoes, mayo, and hot sauce.  I would add the mayo gradually.  Start with 1/4 cup, get that mixed in, and the see if you want more.  I HATE super gloppy salads.
  4. When mixed well, mixed in your bacon.
  5. Taste your creation and salt and pepper according to your tastes.
  6. For best results, let this bad boy chill in the fridge for about an hour prior to eating or serving so that the flavors have time to really get into all of the ingredients.
  7. SMASH!!!!  Seriously, chicken, bacon, sweet potatoes……hot sauce! HEAVEN!

I realize it’s not the most colorful dish, but it’s damned tasty!  I ate it throughout the week as a main dish, as a side dish, in some lettuce wraps, for breakfast, lunch, and dinner.  So really, get AFTER it and live the summer high life! Peace, Love, and Paleo!

-Meister

Sweet Baby Jesus, Garlic Dill Mayo!

dill mayo

I’m not even lying when I tell you that this mayo is SO beyond insane that I stood in my kitchen finding reasons to put it on things so I could lick the spoon.  I mean really, who the hell stands around eating mayo!?!?  Apparently I do, and it’s because this stuff is FREAKING delicious!  Like completely out of control and life changing.  LIFE CHANGING FOLKS!

Honestly, I wasn’t planning on blogging tonight.  I was going to cook a simple dinner, take it easy, and just call it a relaxing night.  And then that damned mayo happened…..and I feel guilty NOT sharing it with you guys.

With that being said, there are a couple of tricks to making paleo mayo.  It can be quite finnicky, but if you just find some patience it’s really pretty easy.  Minimal ingredients, a little bit of time, a LOT of calm and love in your heart, and you have magical mayo at the end! Plus, it makes a good amount!  I can’t wait to use this to make crazy good salads!  I’m thinking some sort of sweet potato salad….probably with bacon.  OOOOOH!  Or a BLT chicken salad!  Yep, that’s happening.  Stay tuned for that one, it’s gonna be good.  I can tell already! See! So much joy, from just a little jar of mayo 🙂

Garlic Dill Mayo

  • 2 egg yolks (save the whites for breakfast!)
  • 1 lemon, juiced (you want about 2-3 tablespoons of fresh lemon juice)
  • 1 cup Extra Light Tasting Olive Oil, seriously, DON’T use regular Extra Virgin, it won’t come together correctly……you could play around with other oils here as well or combinations, but you are going to want it to be a majority of oil that will stay in a liquid state (AKA NOT all coconut oil)
  • 2 tablespoons fresh dill (or 1 tablespoon dried dill)
  • 1/2 teaspoon garlic powder
  • 1/2 teaspoon onion powder
  • 1/2 teaspoon salt

***My directions below are using a food processor.  You COULD whisk by hand or with a hand mixer, or hell, you could even use a blender, but ain’t nobody got time for that!  Let the food processor do all the work!***

  1. In the bowl of your food processor add your egg yolks and the juice from half of your lemon. Pulse it a couple of times to combine.
  2. Set the processor on the lowest setting.  While it is mixing, SLOWLY add in your oil.  Seriously, I’m talking a few drops at a time for probably the first 1/4 cup of oil added.  It WILL take time and patience!!!  Just keep the processor running!  When you have created a emulsion, the mixture will start to thicken and turn opaque.  At this point, you can begin to add in your oil a bit more at a time.  I will warn you, err on the side of adding oil VERY slowly! Once you break the emulsion by adding it too quickly, you are screwed and the mayo is trash!
  3. Once all of the oil has been incorporated (it took me upwards of about 7 minutes to get all of it added) you can stop the processor.  You should have a thick and AWESOME looking mayo!!  Yay! You did it!
  4. At this point, scrape down the sides of the bowl and add in the remaining lemon juice as well as the dill and the spices.  Pulse it a few times to mix everything into the mayo.
  5. Taste!!!  Adjust seasoning as needed, just be prepared to want to eat mayo straight off the spoon.  Welcome to being a weirdo!  Sorry to have sealed this fate for you…
  6. Store it in closed container in the fridge.  It keeps as long as eggs normally would, but seriously, I’d be surprised if mine makes it a full week in my fridge!

The uses for this are totally endless.  Like I said earlier, I’m hoping to bring you an epic mayonnaise based salad here sometime soon.  That just sounds SO FREAKING good right now, not to mention, it kind of screams summer! If all else fails, just smear some of this on top of some grilled or broiled salmon and you will be a happy little camper!  See!!

dill mayo salmon

Peace, Love, and Paleo Mayo!

-Meister

Day 1, on the books!

cilantro lime shrimp

Before I jump into recipe talk, I need to come clean and be brutally honest….I had a LEGITIMATE stare down with some lifesaver mints today in my classroom.  It was beyond stupid!  I’m not even joking when I say that: A. those mints kind of suck B.  I would have eaten one out of boredom, and just because I “couldn’t” have it and C. one of my students TOTALLY called me out on it.  Like I said, it was ridiculous.  This is exactly what happened the last time I did a Whole30.  I started getting random MENTAL cravings for things I don’t even usually eat; however, simply because it’s on the “no list” I instantly want it.  Noooo, I don’t have ANY emotional issues with food.  Clearly not!

Whatever, now that that’s out….today was just a total Monday.  In every sense of the word.  I put myself on autopilot and just went through the day.  Eh, those have to happen every once in a while I suppose.  On the UP side, I should be done with my State Testing this week!!  That will get a huge weight off of my shoulders.  It also means that I get to go back to real life, and better yet, REAL teaching!  Whaaaaat?  For real.  Giving tests is really, REALLY difficult and it sucks the life out of you.  I teach middle school for a variety of reasons, one of which is the amount of energy that I get from my kids.  That just doesn’t happen during testing time because of the serious environment.  Much like sunshine, good food, and excellent music, I need adolescent energy.  I’m weird.  Deal with it.

On to food!  I sat last night looking in my freezer thinking, “hmm…..shrimp?”  So I went with it!  My mom makes this Chinese coleslaw that has crushed up Ramen noodles in it.  She makes it for every summer party she goes to.  I hate it.  In fact, I hate raw cabbage in coleslaw form.  One of my friends describes it as wet grass and I couldn’t agree more…..that was until I had myself some Napa cabbage!  That shit is BOMB!  It’s also about the only cabbage I can stand in coleslaw form.  So, the slaw portion of my dinner was inspired by my wonderful Ma, and her super popular (though hated by me because I’m a jerk like that) coleslaw.  The shrimp was kind of an after thought.  I knew I wanted something spicy and green and fresh.  Plus, I’m totally in love with fresh cilantro right now….so that’s how this shrimp came to be!  Not to mention limes make me think of cocktails, which makes me think of summer…..which I want, NOW.  Here goes!

napa slaw

Napa Cabbage Slaw

  • 1 head of Napa cabbage, shredded (it’s a much more delicate leaf, both texture and flavor….or get regular cabbage if you dig it.  I don’t, not raw at least!)
  • 1 small red onion, thinly sliced
  • 1-2 jalapeno peppers, diced finely
  • 1 bunch (8-10) scallions, chopped up….both white and greens
  • 1/2 cup sliced almonds
  • 1/4 cup apple cider vinegar
  • 1/4 cup coconut aminos (you could use tamari or GF soy sauce…but I’m staying strict to no soy)
  • 1/2 cup olive oil
  • 1 teaspoon garlic powder
  • 1 teaspoon onion powder
  • 1/2 teaspoon dried cilantro
  • 1 teaspoon salt
  • Juice of 1 lime
  1. In a large bowl, combine the cabbage, onion, peppers, and scallions in a large bowl.
  2. In a jar (or something else you can shake up dressing in) combine your vinegar, coconut aminos, olive oil, lime juice, and all spices.  Cap the jar and shake the SHIT out of it.  I happened to dance around to Whitney Houston in my kitchen while preparing this.  It helped, trust me.
  3. Pour about half of the dressing over the cabbage and toss well to coat it.
  4. Let it sit in the fridge for about 10-15 minutes to blend flavors and such.  Top it with the sliced almonds and serve!  Top with more dressing if you like yours saucy-er!  Or better yet!  Top it with this shrimp!

Spicy Cilantro Lime Shrimp

  • 1-1.5 pounds of medium sized raw shrimp, peeled, de-veined , and tails off
  • 2 bunches of scallions, white and greens, cut into 2 inch pieces
  • 2 serrano peppers, thinly sliced into rounds (these little guys can get HOT, so if you don’t get down like that, sub out jalapenos, or no peppers!)
  • 1 bunch fresh cilantro
  • Juice of 2 limes
  • 1 teaspoon garlic powder
  • 1 teaspoon onion powder
  • 1 teaspoon dried cilantro
  • 1 tablespoon coconut oil
  1. In a deep skillet, melt your coconut oil.
  2. When heated, add your shrimp in a single layer.  Season the shrimp with half of the seasoning mixture. Cook for 2-3 minutes or until shrimp start to turn pink and curl up a bit.
  3. Flip shrimp and season with the remaining seasonings, it’ll form almost a crust on the shrimp.  Cook for another 2 minutes on this side.
  4. When shrimp is ALMOST cooked through, push it to the sides of the pan.  In the center, add your scallions and peppers.  Saute them for 2-3 minutes.
  5. Toss the shrimp and the veggies together to finish cooking.  Add in your lime juice and toss in your fresh cilantro.  Stir for about 1 minute to heat them through and coat your mixture in the juice.
  6. Devour.  For real.  I’m surprised I was able to snap a picture before scarfing mine down…..let alone exercise enough self control to pack up leftovers!

Here’s to freaking delicious food, kitchen dancing, the light at the end of the tunnel, and day 1 of Operation Cancun in the books!  I dare some stupid Lifesaver Mint to tempt me tomorrow….ain’t nobody got time for that! Peace, Love, and Paleo!

-Meister

Abandonment Issues…..

Well friends, I sincerely apologize for abandoning this site for the past week.  Although, in my defense, I kind of called it ahead of time….”slow” weeks on the calendar ALWAYS end up crazy for me!  I told you so!!

Anyways, this past week was great.  Got a lot of work done, continued to help at the gym, officially began my CrossFit Open pursuit, and bought some really fun new stuff yesterday!  I’m completely loving the new gym space, and I keep telling people about it every chance I get.  For REALZ, the new and improved CrossFit Artis is going to be insane when all is said and done!  I mean, it’s already pretty freaking awesome….but it’s only gonna keep getting better!  Jon and Jen have built an excellent community that I’m proud to say I’m a part of!

Speaking of community, I’m truly grateful to have been a part of the 13.1 Open workout yesterday.  It was so great to see so many of my friends getting AFTER it and giving it their all.  I loved cheering for and counting reps for them.  The entire building was just oozing determination.  My performance was, eh, well it just was.  I was kind of upset with my personal performance at first, but when I really took a step back and looked at it, I’m OK with it.  Considering I only started this entire CrossFit journey about 8 months ago, and prior to that I had never touched any sort of weight lifting equipment in my entire life…..where I’m at is pretty good for me.  That being said, I’m not getting complacent.  I’m obstinate enough to not be happy with myself, and continue to push to improve.  If ANYTHING, that is what has pushed me to this new place in my life….never settling.  So, I’ll be DAMNED if I can’t snatch 75 pounds by the Open next year.  I’ve done it before, but all things considered, it wasn’t happening on Saturday.  Whatevs.  I’m cool.

This week is going to be full of cooking and baking!  That means lots of recipes for you guys! Yay.  That being said, I’m gonna be honest and say that I may not be able to post again until Wednesday.  We are sending my last childhood pet to kitty heaven tomorrow night, so needless to say I’ll be a mess.  I’ll be doing good to not just stuff my face with chips and tequila.  Pets make me so emotional, but I suppose that’s a good thing, and proves that I’m really NOT harboring a cold, dead, heart of ice.  Tuesday night, I’ll be baking a ton for a baby shower at school.  Depending on how things go that evening, I might have something fantastic for you, but no promises until Wednesday!  I promise I won’t neglect this for another whole week like I did last week.  That was a real jerk move on my part.  Sorry friends.

So, food time!  I made the bacon wrapped brussels sprouts because I got a shout out about making them on my Facebook from my friend Brooke.  Not gonna lie, these were AMAZING!  Nothing is better than a veggie roasted in bacon fat, NOTHING!!

bacon brussels

Bacon Wrapped Brussels Sprouts

  • 1 pound bacon (I get the good stuff….none of that crap with nitrates and such)
  • 25-30 small brussels sprouts (trim of the stems and remove a few of the outer leaves)
  • 25-30 toothpicks
  1. Preheat your oven to 350 degrees.
  2. Line a baking sheet with aluminum foil.
  3. Cut your bacon strips in half in order to double the amount of bacon.  If you have 12 strips, then you will get 24 pieces, therefore you are able to wrap 24 brussels.  Make sense?  I hope so.
  4. Wrap each brussel in a half strip of bacon and secure the bacon into the brussel with a toothpick.  Some are more fickle than others and will need a couple of toothpicks.  Don’t be ashamed to jam like 3 or 4 in there….no judgment!
  5. Arrange on your baking sheet and bake for about 30 minutes.  You will want to bake them until the bacon is cooked fully.  This is why you want smaller brussels, if they get too big, they won’t cook through in the amount of time it takes the bacon to cook.
  6. Remove the toothpicks and enjoy!  I ate mine with a giant hunk of sirloin.  Nothing like meat with a side of meat!

These are super easy to make and are SUPER delicious!  Hope you enjoy them as much as I did!  Sending bacon love!

-Meister

Lazy + Cold = Easy Dinner 2fer

burrito bowl

So, I’m currently typing this with gloves on….no joke.  They are purple and pink, and have princess crowns on them.  Pretty sure my parents gave them to me as a gag gift stocking stuffer a couple of years ago.  My hands are SO FREAKING cold!!!  Actually, all of me is cold, and I can’t seem to get warm.  Tonight is definitely going to be a night where I sleep in long pants and long sleeves……which is EXTREMELY rare for me and probably means I’m dying.  And as far as the gloves go, well, they were closest thing at hand (no pun intended).  They were already out, since little brother wore them to shovel the driveway  when it snowed last.  He’s secure in himself and will rock some sweet princess gloves whenever he feels like it.

Speaking of little brother, he made the comment that I need to work on my food photos.  Duh.  I know this.  I never claimed to be a food photographer.  In fact, much of what you see on this page is pics that I snap of my food immediately prior to me stuffing my face with it!  Which also accounts for some ridiculously sized portions….don’t judge.  Sometimes, a girl just needs to smash.  Got it?  But nevertheless, my most sincere apologize for my crappy food pics.  I’ll work on it….eventually.  Promise!

The recipes I’m posting tonight are kind of a “choose your own adventure” dinner.  I started off by being super lazy and making the chicken in the crockpot, with the intention of making tacos.  Then I got home Monday night, said screw it, and cooked up some cauliflower rice….and BOOM!  The burrito bowl was born.  Skip to tonight were I was feeling lazy again….so I stuffed the leftovers into peppers and just popped them in the oven.  Easy eats are the tastiest kind!!  So here they are.  Eat them all together, make them separately, do whatever your heart desires! Just get down with your paleo self.

stuffed peppers

Crockpot Spicy Pulled Chicken

  • 2 pounds frozen chicken (I used all breast meat, but you could use thighs as well, or a combo)
  • 2 cups prepared salsa (use a brand without a bunch of extra crap in it, or make your own….choose your heat level to suit your tastes)
  • 2 small cans diced green chiles (do not drain these!)
  • 1 jalapeno, seeds and ribs removed, diced
  • 1 tablespoon chili powder
  • 1 teaspoon cumin
  • 1 teaspoon dried cilantro
  • 1 teaspoon onion powder
  • 1 teaspoon garlic powder
  1. Place frozen chicken in crockpot.
  2. Cover chicken with all remaining ingredients.
  3. Set your crockpot to LOW and cook for 8 hours. Mine went for 8 hours, then I had little brother turn it to WARM when he got home….and it was on that setting for another 2 hours.
  4. Shred chicken with a fork!

Cilantro Lime Cauliflower Rice

  • 2 smallish heads of cauliflower
  • 1 small yellow onion, diced
  • 4 cloves garlic, minced
  • 1 bunch fresh cilantro
  • 2 limes
  • Salt to taste
  1. Using the chopping blade on a food processor (or you could grate it by hand, but that would SUCK hardcore) in small batches, add your cauliflower and pulse it until it looks like grains of rice.  I had to do this in about 4 batches.  No worries. I just dumped it all into a big bowl until I had pulverized all of it!
  2. In a deep skillet, heat 2 tablespoons of coconut oil over medium high heat.
  3. Saute onions and garlic until they begin to get a bit of color and start to soften….about 5 minutes.
  4. Add in your “rice” and stir it around in the onions, garlic, and oil.  It’s cool if your pan seems over-loaded, it actually helps to create some steam.  Continue to stir it every couple of minutes until the rice begins to soften up a bit and gets to a texture that you like for cooked rice.  Mine went for about 7 minutes or so.
  5. Squeeze the juice of your limes over your rice and toss in the chopped cilantro.  Continue to cook with these ingredients for another 5 minutes.
  6. EAT!

To make the burrito bowl:

  1. Serve up some rice in a bowl.
  2. Top it with some of your chicken.
  3. For toppings, I added some more salsa, some chopped lettuce, some Sriracha, some cilantro, and some avocado…DUH.
  4. Mix it all up until it’s just a mess of delicious food and SMASH!  Relish in how awesome your cooking abilities are, and how that “chain restaurant” that offers a similar burrito bowl, ain’t got NOTHING on you!

To make the stuffed peppers:

  1. Preheat your oven to 375 degrees.
  2. Cut the tops off of 4 green peppers, and pull out all seeds and ribs, but leaving the pepper in tact as a cup.
  3. Stuff each pepper about half way full of your leftover rice.
  4. Top each pepper with your leftover pulled chicken.
  5. Arrange in a glass baking dish.
  6. Put about 1/2 inch of water in the bottom of your dish to create some steam while cooking.
  7. Bake for 30-35 minutes (or until peppers are cooked to desired done-ness….I like mine on the crunchier side, so I actually pull mine out at about 25 minutes)
  8. Top with whatever toppings you choose!  I used the same ones I topped my burrito bowls with.

Hopefully this gives some options to play around with!  It was all STUPIDLY easy, and aided in my general laziness.  Tomorrow I’m going to get all sorts of crazy and wrap some brussels sprouts in bacon….so you just wait!  Sending warm, princess glove, chamomile tea drinking love your way!

-Meister


Beginnings and Endings

A couple of major events transpired this weekend:

1. We got to demo the CRAP out of the new gym space!  Took down some walls….which mostly meant I stood around and watched dudes work!  It also means I got to play with powertools…..OH YEAH!!! Anyways, I baked for the folks working. Duh! That’s what I do!  When all was said and done, the new space is completely opened up, and the possibilities are truly endless!!  And look, here’s proof that I actually did some work…..oh who am I kidding, I can’t be serious about anything.

OHS 2 by 4

2.  Miss Olivia had her going away party.  It was a completely wonderful send off to quite possibly one of the most BAD ASS chicks I’ve ever met.  I’m super sad to see her go but am completely confident she will continue to be a BAMF in the next chapter of her life.  Hip Hop Fridays won’t be the same without her 😦  Here is a vanity shot of some of the foxiest ladies at the party…..oh wait!  Who is the creeper with devil eyes in the middle? Hmm….why do my eyes ALWAYS do that!?!?! Ugh.

pretty ladies

3.  I did absolutely NOTHING for the remainder of the weekend.  Staying out, dancing like a fool, and having just a couple of drinks totally took it out of me.  Add in the fact that I think I might be getting sick, and BOOM!  You’ve got a perfect storm that amounts to me doing NOTHING all Sunday!

Looking at the calendar for this week kind of scares me….I have nothing on my school calendar, and nothing on my personal calendar.  Why does this scare me?  Because I can’t honestly believe that I will have a week of nothing.  When these weeks usually come around, something manages to EXPLODE! Tame just doesn’t exist in my world.  I’m trying to trust that perhaps the universe has left this week open for me because the good Lord knows that I’m going to be needed to support those nearest and dearest to me.  Lots going on in the lives of those closest to me, so I’m doing my best to put as much positivity out there as I can!!

OK, onto food!  So, I made this cioppino last Thursday.  I’m trying to be a good part-time Catholic and observe not eating meat on Fridays during Lent.  This stew is freaking AMAZING!! It’s slightly spicy and totally delicious.  Typically, the best part of cioppino is dipping some crusty bread into the tomato broth, but yeah, that obviously didn’t happen!  I made some plantain chips to go with it though, and those were BOMB!!

cioppino

Quick Cioppino with Plantain Chips

To make the Plantain Chips:

  • 2 large, slightly ripe (light yellow in color) plantains
  • Coconut oil, for brushing
  • Salt (or any other spices you might want to use)
  1. Preheat your oven to 400 degrees.
  2. Line a baking sheet with parchment paper.  Brush the parchment paper with a thin coating of coconut oil. (I know this seems counter-intuitive….just do it. Trust me.)
  3. Peel your plantains. I have found it easiest to cut off both ends, then slit through the peel lengthwise.  Use your thumb to separate the peel from the plantain.
  4. Thinly slice your plantains.  Think slightly thicker than a quarter…about as thick as a half dollar.  The important thing is to try to get them all the same thickness.
  5. Arrange the slices on your baking sheet and brush the tops of them with some more coconut oil.
  6. Sprinkle with salt.
  7. Bake for 10 minutes at 400 degrees.
  8. Flip them after 10 minutes, then bake for another 7-8 minutes.
  9. Remove them from the oven and let them cool.  They get crispier as they cool.
  10. Stuff your face!  They are SUPER addictive.  I don’t ever have any leftovers….

To make the Cioppino:

  • 1 medium red onion, diced
  • 2 green bell peppers, diced
  • 4 cloves garlic, minced
  • 25 oz. jar of marinara sauce (get the good stuff without all of the added CRAP in it!  Or just use about 25 ounces of tomato sauce)
  • 8 oz. bottle of clam juice (totally gross to think about, but it makes it SO GOOD!)
  • 1 cup vegetable stock (you could use chicken stock, but I was trying to keep it meat free)
  • Pinch of red pepper flakes
  • 1/2 teaspoon dried basil
  • 4 sprigs of fresh thyme (remove the tiny little leaves from the stems)
  • 1/2 teaspoon dried oregano
  • 1 bunch fresh flat leaf parsley
  • 2 pounds of seafood (Use whatever floats your boat.  I used 2 packages of Trader Joe’s Seafood Blend from the freezer case.  Use a mix of chopped white fish, shrimp, scallops, calamari, whatever you’ve got!  Fresh or frozen, doesn’t really matter)
  1. In a large soup pot, add in your veggies (onion, bell pepper, and garlic) and saute until they are translucent, about 5 minutes.
  2. Stir in the marinara, clam juice, veggie stock, red pepper flakes, dried herbs, and thyme.  Simmer on medium low heat for about 10 minutes.
  3. Add in your seafood.  Continue to simmer until seafood is cooked through.  Cooking time will depend on whether you are using precooked/frozen vs. fresh seafood.  I let mine simmer for about 15 minutes, just for good measure.
  4. Stir in half of your fresh parsley.
  5. Serve it up in big bowls.  Top with more fresh parsley and some of those crispy plantain chips!
  6. Enjoy the briny, tomato-y goodness!!!

I shared this with one of my girls from the gym, Ava.  She totally dug it.  Pretty sure you will too!  She’s awesome, and you want to be like her…..so make this!  Sending much love and positivity!

-Meister


Sunday ramblings and Kale Chips!

kale chips

Alright friends, I gotta be real about something.  Truth time.  I am going to throw away an entire waffle iron this morning.  It pissed me off one too many times.  There are few things in this world that irritate me more than malfunctioning kitchen equipment!  So the WHOLE iron (ruined waffle still inside) is going in the trash…as soon as it cools down enough to be handled.  That’ll teach you to destroy an epic waffle and smoke up my entire house!! Oh hell no, enjoy the trashcan.

This weekend has been kind of crazy.  Lots of stuff is going down, so I have just been trying to maintain the calm!  In an effort to do that, I haven’t gotten ANYTHING prepped for the week in terms of meal-planning or food, so it’s going to be an interesting afternoon for sure!  But this week should be GREAT in terms of recipes!  I’m trying out a couple of new things, as well as  making some old favorites.  Love it!

Quick recipe for you today!  Just my plain old kale chips.  They are highly addictive.  I have a serious problem with them, for REAL!  People always ask me how I store them so they don’t get all soggy.  Honestly, I couldn’t tell you how to store them….because I never have any to store.  Once I make them, addiction kicks into high gear and I go into BINGE mode on these poor little guys!  Eh, I suppose there are FAR worse things I could be addicted to…..like heroin, or meth.  THAT would be a real problem.

Kale Chips

  • 1 bunch or bag of kale (honestly, it doesn’t matter which kind you use, you want the curly stuff, buy the curly stuff.  You want dino kale, get the dino….your choice!)
  • 2 tablespoons olive oil
  • Salt, pepper, onion powder, garlic powder to taste
  1. Preheat oven to 350 degrees.
  2. Line 2 baking sheets with aluminum foil.
  3. Evenly spread kale onto your baking sheets.  Make sure you remove any thick stems at this point, they don’t get so delicious when they bake.  If using whole kale, tear the leaves into pieces.
  4. Drizzle with olive oil and toss on your spices.
  5. Get down and dirty and mix it all up using your hands.  Spread the kale into an even layer once all of it has been coated with the oil and spices.
  6. Bake for 10-20 minutes.  Start checking at 10 minutes and keep checking every couple of minutes until kale is crispy and starting to brown.  (Cooking time will depend on the thickness of the kale and how much you have crammed onto your baking sheet)
  7. Devour.  They are salty, crispy, and delicious!!

Enjoy these!  And seriously, I dare you to try and not eat the entire pan.  I DARE YOU!!! I’m betting it can’t be done….and if you CAN do it, you have a hell of a lot more willpower than I do!  Much love!

-Meister