Naughty Naughty Comfort Food Bliss

meatball bake

How freaking delicious does that look?! I mean, how could I NOT lead with this picture?  This, my friends, is a meatball bake.  Yes indeed!  Hidden under all of that gloriousness are meatballs.  Who would’ve known?!

Paleo confession time: I crave traditional comfort foods all the time.  Seriously, ALL the time.  For me, these foods are usually something really starchy, smothered in a red sauce and baked, or anything covered in Gravy.  I’m German and Irish.  We are gravy loving, potato smashing folks.  I can’t deny my genetics, nor can I refuse these tasty, tasty foods. So I’ve tried desperately to find ways to satisfy these cravings….and since I’ve YET to find an epic gravy recipe that comes anywhere CLOSE to being Paleo, I usually go the smothered in red sauce route to feed my hungry soul.

Paleo Confession #2:  I eat cheese.  Sue me.  Most of the time I shoot for raw milk or grassfed cheeses, but sometimes I don’t. Don’t care.  If some cheese is going to bring me to an early death, bring it on!

So my friends, enjoy! And don’t judge me too harshly for the aforementioned confessions.

Meatball Bake

     For the meatballs:

  • 1.5 – 2 pounds ground beef
  • 8-10 fresh basil leaves, finely chopped
  • 4-5 cloves garlic, finely minced
  • 1/4 cup dried minced onion
  • 1 egg, beaten
  • 4 heaping tablespoons of almond flour (can sub coconut flour, but cut to 2 tbsp)
  • Spices to taste (salt, pepper, dried oregano)

     For the sauce topping:

  • 2 cans fire-roasted tomatoes
  • 1 can artichoke hearts, roughly chopped
  • Freshly torn basil
  • Grated cheese…..if that’s how you get down
  1. Preheat oven to 375 degrees.
  2. Combine all ingredients for meatballs in a large bowl and mix together thoroughly.  Get in there all down and dirty like with your hands and get after it.
  3. Roll into balls (I made mine bigger than walnut-sized) and place in a deep baking dish.  You should be able to get around 16-20 meatballs out of the mixture.
  4. Bake meatballs uncovered for 25 minutes, or until they are browned on the outside.
  5. Remove from the oven and top with your chopped up artichoke hearts.
  6. Then layer on your two cans of fire-roasted tomatoes over the top.
  7. Put your dish back in the oven and bake for another 30 minutes.
  8. When your sauce is bubbling like crazy and starting to brown around the edges, remove from oven.
  9. Top with your fresh torn basil and grated cheese and pop it back in the oven for 5 more minutes to melt.
  10. SMASH ON COMFORT FOOD GOODNESS!……after you’ve let it cool down first of course.  It will come out hotter than the surface of the sun, and you don’t want to turn your mouth to lava.  Safety first, friends. Safety first.

There it is peeps.  Get after it!  Fill your bellies with simple goodness.  Make it happen.  And live it up with your naughty paleo selves. 🙂

Peace, Love, and Paleo.

Meister

Guess who’s back????

Well hey there long lost friends!  Clearly, I’ve been away for a bit.  Ok, who am I kidding?  I fell off the face of the Earth for a few months.  In reality, things have been pretty hectic….and while they haven’t at ALL calmed down, they seem to be settling into some sort of twisted sense of normal for me.

That, coupled with a particularly nasty case of academic writer’s block, brings be back to you!  What should I really be doing right now?  Writing my admissions essays…but NO! I made a tragically stupid mistake by looking at the degree plan of study (in depth) that I’m applying for and subsequently am having a mini-panic attack.  Joy. However, my somewhat flaky nature and ability to be scared by a PDF is GREAT for you guys….because I’m back!  If for no other reason that to prove to myself that I can still write.

If it gets rambly, my most sincere apologies.  I am just navigating through the storm of not actually having written anything for months.  Sue me.

I’m gonna do what I do best!  Serve up a healthy dose of snark and a bangin’ recipe!  With that, I give you these beauties….
bison meatballs

These little bad boys are some CRAZY delicious bison meatballs!  Now, if you are finding yourself saying, “EEEWW!  Bison!?!”  just freaking take my word for it, bison is AMAZING!  Like, life-changing amazing.  In fact, I don’t know why I didn’t get on the bison train sooner!  Now, if you can’t find bison, these could be made with ground beef….I suppose.  But if you CAN find bison (or happen to have an old friend from elementary school who was gifted a bison ranch as a wedding gift…..I mean, it could happen!) load up on as much of that stuff as you can!

Bison Meatballs

  • 2 pounds ground bison
  • 2-3 cloves of garlic, finely minced
  • 2-3 small red chile peppers, finely minced seeds and all! (you could sub 1-2 teaspoons of crushed red pepper depending on the heat level you want)
  • 2 teaspoon onion powder
  • 2 teaspoon garlic powder
  • 1/2 teaspoon ground sage
  • 1 teaspoon dried thyme
  • 2 teaspoons salt
  • Ground Black pepper….as much as you dig!
  1. Combine all ingredients in a large bowl and mix by hand.
  2. Get good and dirty making sure all spices are incorporated thoroughly!
  3. Roll mixture into walnut-sized balls.  Mine made just over 2 dozen meatballs.
  4. Heat 1-2 tablespoons in a deep skillet and add meatballs to your pan.
  5. Brown on all sides, about 2-3 minutes per side until you get a nice brown crust on each side.
  6. When meatballs are browned on all sides, I topped mine with my favorite red sauce and simmered them somewhat covered (more to protect my cooktop from splatters) on low for about 10 minutes.
  7. Toss those bad boys on some spaghetti squash and enjoy!

I hope that these are rockin’ for ya!  They were pretty much one of the best things I’ve ever made….but I’m a sucker for simple comfort foods.

Here’s to being back! Peace, Love, and Paleo!

Meister

Apologies, Insanity, and Crockpot Cooking

Holy CRAP!  So it’s been over a week since I’ve been on here…..my apologies.  For real, I feel like kind of a dick about it.  My life went from super calm and peaceful with seemingly TONS of down time to COMPLETELY FREAKING INSANE in the course of a couple of days.  I’ve just been all over the place, putting out fires left and right, and pretty much going into survival mode.

Couple of things to keep y’all updated and give you a taste of what I’m dealing with:

  1. Mexico is a NO go.  Which totally sucks.  Ultimately it was a money thing.  I mean, don’t get me wrong, I LOVE what I do, but while public education pays the bills, it doesn’t always allow for extra expenses…..like a trip to Mexico when the cost of an all-inclusive resort was grossly out of your price range.
  2. Subsequently, due to lack of Mexico trip and lack of funds…..the “Cancun Challenge” is also no longer going.  I am still committed to rocking the paleo way, but I’m allowing myself a drink or two at special occasions as well as a bit of natural sugar every once in a while.  That being said, MINIMAL cheats, again only for special occasions, and still never any gluten.
  3. The end of the school year is rapidly approaching.  As I sit here typing this, I have 14 days with students left.  In that 14 days, we have 2 fieldtrips, final exams, 6 parent meetings, final reports to write on 10 of my students, OH! and I have to find time in there to clean and pack up my classroom.
  4. Toss a couple of roadtrips to Minneapolis in there and I’m quickly becoming an over-scheduled crazy person.

Speaking of roadtrips, I escaped to Minneapolis this past weekend and it was glorious.  I hung out with some of my nearest and dearest guy friends, and had an amazing weekend full of epic deep conversation, excellent food, Cinco de Mayo celebrations, wearing sweatpants, and consuming mass amounts of hard cider and playing on playground equipment.  It was maybe one of the greatest weekends in a very long time!  Here are just a couple of pics from the weekend…..both food related of course.

   paleofail    cincofeast

Those Strongbows were purchased purely because they were the only cider available in a tallboy can….and that pic on the right is the EPIC Cinco feast we made.  It’s all topped off by some freaking delicious bacon avocado pico deliciousness that the boys and I just made up on the spot.  Out. Of. Control.  Did I mention I love those boys?  Because I do…..mostly because we got to cook together, drink together, and they indulge silly ideas like bacon avocado pico, microwaving avocados, and swinging on swings with a drink in your hand.  That’s friendship.  We also made sure to music bomb the bar we hung out in with plenty of Rick Astley, Carly Rae Jepsen, and Miley Cyrus.  Yeah, we’re those guys.

Enough rambling….on to food!  I am going to apologize in advance for this picture, because it looks really gross.  I promise, it’s so ridiculously good though.  I just suck at taking pics.  Not to mention this is SUPER easy.  I prepped it at night and let it cook overnight so it was ready in the morning.  Boom.  Instant lunches ready to go!

chickenpicatta

Crockpot Chicken Picatta

  • 1.5 pounds boneless skinless chicken breast, cut into large chunks
  • Juice of 3-4 lemons
  • 1/4 cup plus 2 tablespoons ghee (or grassfed butter if that’s your thing!)
  • 1 medium onion, cut into large pieces
  • 3-4 cloves garlic, rough chopped
  • 2-3 tablespoons capers, plus some of the liquid from the jar…about 1 tablespoon
  1. In the bottom of your crockpot, put your onions and garlic.
  2. Layer your raw chicken in on top next. Season it with some salt and pepper, to your tastes. (You could put your chicken in frozen, just add about 2 hours onto your cooking time).
  3. On top of your chicken, add your capers, lemon juice, and chunk up your ghee and make sure you evenly distribute it.  It’ll help it melt more evenly.
  4. Cook on low for about 6 hours.  If you are going to go longer than 6 hours, I would add in some additional liquid.  Probably 1/2 cup – 1 cup of chicken stock.
  5. Serve it up with some spaghetti squash and enjoy a buttery delicious CRAZY STUPID EASY meal!

There it is folks!  I promise to try to get on here more than once a week.  That’s just rude on my part, and I apologize for being a dick like that.  In the mean time, cheers to good friendships, good food, and letting out your inner kid! Peace, Love, and Paleo!

-Meister

Prosciutto and Sage Chicken Roll Ups

chicken and sage rolls

I’m officially on the downhill slide of my first 30 days of my almost 90 day Cancun challenge!  Honestly, I feel like I’m somewhat over the sugar urges.  I haven’t wanted to smash on sweet stuff in almost a week…..despite having a plate of homemade cupcakes on my kitchen counter!  Now THAT, my friends is willpower!  I just keep looking at them and thinking…..you know you don’t want that, and it won’t even be that satisfying, AND you’ll feel like crap afterwards.  By the time I rationalize all of that, I’m usually good!

Now salt?  That is where my bizarre food cravings are kicking into high gear.  Maybe it’s the fact that my allergies are kicking up because it’s FINALLY maybe starting to really act like spring here!!  But for some reason, I can’t seem to get enough salt!  Everything I make is tasting bland, and I’ve NEVER been someone who reaches for the salt shaker…..weird.  I’m sure I have some sort of imbalance going on inside of me, but whatever, I’m just gonna ride it out for now!

Speaking of the weather finally turning around here…..it was ACTUALLY sunny today!  And somewhat warm!  And as we speak, I’m watching a full-ish moon rising in a CLEAR sky.  Simple pleasures, folks.  I swear, the fact that it was sunny today improved my mood hugely.  By the end of the week, it’s supposed to be almost 70 degrees!  That’s damn near flip flop weather…..which means I need to get it together and go get a pedicure.  Ain’t NOBODY got time for unpolished toes.  For real.

Alright, food for tonight.  My mom used to make these chicken roll ups with prosciutto, sage, and then some sort of cheese.  Then she’d make a wine and mushroom gravy for them……needless to say, they were off the chain!  So I was feeling a hankering for these bad boys.  I just left out the cheese (duh….) and skipped out on a sauce, mostly due to time constraints.  These turned out great!

Prosciutto and Sage Chicken Roll Ups

  • 4 large chicken breasts, pounded out to about 1/2 inch thick
  • 3 oz. prosciutto
  • 1 oz. package of fresh sage……or about 30ish sage leaves (you could use ground sage here, but fresh is much better! If using dry, use between 1/4 and 1/2 teaspoon per roll, depending on how “sage-y” you like it)
  • toothpicks
  • garlic powder, onion powder, salt, pepper, celery salt
  1. Preheat oven to 375 degrees.
  2. Lay out you pounded out chicken breasts and lightly sprinkle the top side with each of the spices….NOT the sage though, save that for later!
  3. Layer 2 slices of prosciutto on each piece of chicken.
  4. Next, evenly arrange your sage leaves (or dried sage) over your prosciutto.
  5. Roll your chicken breasts up with all of the goodies inside and secure with 3-4 toothpicks.  You want to make sure that you roll them tightly and tuck any exposed goodies in on the ends.  Get good and messy with this!
  6. Lightly sprinkle the outside with salt and fresh cracked pepper.
  7. In a deep skillet, melt 1 tablespoon of coconut oil.
  8. Lightly brown the chicken rolls in the coconut oil on all sides. You will want to give them about 2-3 minutes per side.  This might get kind of funky with toothpicks sticking out every which way….just do your best to get as much browning on there as possible!
  9. Once you have browned as much of the outsides as you can, place chicken rolls on a foil lined baking sheet and bake for 10-15 minutes.  This will depend on how thick your chicken rolls are and how long they actually cooked in your skillet.  Use a meat thermometer to check (or do like I did and at 15 minutes, pull one out and cut it in half…..if it’s still pink, keep cooking!)
  10. Remove them from the oven, remove the toothpicks and devour!

I served mine sliced over some sauteed and steamed kale with sundried tomatoes.  It was insanely delicious and took me right back to my Mama’s old favorite! Seriously, the browned chicken breast, the salty slightly bacon-y flavor from the prosciutto, the earthy sage….MMM!!!  So good!  Hope you enjoy them!  They are a total “WOW!” meal as well because they look really pretty….so get after it! Peace, Love, and Paleo!

-Meister

Avocado Pesto

avo pesto

As the weekend draws to a close I need to put two things out there.  First, I’m sorry I haven’t posted until now…I realize it’s been a couple of days.  Things have been a wee bit crazy around here and I chose to support the people in my world instead of blog, my most sincere apologies.  Secondly, I have come to truly value spending time with people who build me up positively.  One of my oldest dearest friends is in town, and seeing her really lifted me up today.

This week is gearing up to be a crazy one!  Two fieldtrips at school means that I need to plan lunches that can be eaten on the go…..which on a Whole30, ends up looking like a bunch of random stuff thrown together.  Seriously, on Tuesday, I’m pretty sure I’m taking a pouch of salmon, a few clementines, some coconut flakes, and some celery and carrots.  It’s all “snack” foods, rolled together to make it count as a meal.  Meh, it happens!

Speaking of my Whole 30/90ish, tomorrow marks day 15!  In the world of a pure Whole30, that’s the halfway mark!  I’m so proud of my girl Ava…..we are sticking with it!  I’m definitely noticing bodily changes, and my incessant cravings for sugar are seeming to dwindle, so I’ll take it!  I even baked a pie, a FREAKING PIE, without tasting a single bit of the batter/mix/filling.  Willpower has returned to me, and boy does it feel good!

Onto food!  This avocado pesto started out as just regular pesto….until I realized I had a couple of avocados lying around that were going to go bad if I didn’t use them.  I figured, hell, they were green too, so what would it hurt to just toss them in?  It didn’t hurt a damn thing.  In fact, in increased the awesomeness of this pesto by about 10 fold!  Enjoy!

Avocado Pesto

  • 3 oz. fresh basil (I used the big, deep container from Trader Joe’s)
  • 1 oz. fresh parsley (again, used the small pack from Trader Joe’s)
  • 3 garlic cloves, peeled and smashed
  • 2 ripe avocados
  • 1/2 teaspoon salt
  • 1/2 teaspoon onion powder
  • Juice of 1 lemon
  • 1/2 cup olive oil, give or take….depending on how thick you like your sauce
  1. In a food processor, add your fresh herbs, garlic cloves, and your salt. Pulse until herbs are chopped down into very small pieces, and the mix is well combined.
  2. Add in your avocados, lemon juice, and spices.  Pulse to smash up the avocados and mix it all together into a green paste.
  3. Stream in your olive oil until you achieve the consistency that you like.  I used right at 1/2 cup of olive oil, but you do whatever brings you joy!
  4. Taste to make sure it is seasoned well.  Don’t fear, the garlic will be pretty sharp at first….it will mellow a bit with time.  But I like the garlicky kick!  Roll with it!
  5. Use it to top spaghetti squash, or chicken, or pan seared pork chops AND spaghetti squash…..like I did!
  6. SMASH!
  7. Store the leftovers in the fridge……and feel free to serve it warm or at room temp.  It’s delish either way!

This is going to become a staple in my kitchen.  I can’t wait to toss some grilled veggies in it once the weather turns around for good!! Peace, Love, and Paleo!

-Meister

Fighting Sugar Demons….

minty temptation

For real.  Sorry if this offends you, it’s truth.

Remember when I talked about those STUPID Lifesavers mints in my desk drawer haunting me?? Yeah, here they are, trying that crap again.  Seriously, every single time I opened this drawer I caught a minty whiff.  It took every bit of willpower I had today NOT to destroy these.  Again, they aren’t even worth it!  If I’m gonna go to sugar town on crappy candy, I’m gonna get after some Hot Tamales…..because THOSE are perfection!

I’m at the successful completion of Day 4 of my Cancun Challenge!  It honestly, food wise, hasn’t been that difficult for me yet.  Yes, I’ve had a couple of random cravings; however, when those pass, I’m good.  I was eating pretty strictly Paleo before I started.  I had completely cut out gluten for over a year, and had cut down on processed junk long ago.  But I have to be honest, the true test will be this weekend.  I always ALWAYS generally do some sort of baking on the weekends.  Not sure what I’m going to do with myself!  Plus, I don’t have family dinner on Sunday to look forward to because my parents left this morning for Maui.  They are jerks.  Flaunting their Hawaiian gear while here in good old O-town, we’ve had every possible form of precipitation in the last 24 hours.  That being said, I’m pretty sure BOTH my folks packed their PaleoMeister shirts, and intend to rock the shit out of them all over that island.  I’m fairly certain there will be photographic evidence of this, and it will likely end up here…..because although they may be jerks, they are FREAKING ADORABLE.  For real, my folks are the greatest!

Guess what else is awesome?!?  I finished my State Testing today!!!  This is HUGE!  So relieved to go back to my regular schedule tomorrow.  Now it’s just 6 glorious weeks until summer break!  On the whole, this year has been amazing so far.  Great coworkers, great building, and GREAT kids.  Gonna really miss some of the 8th graders as they go on to high school….but until that day comes, I’m hoping for a ROCKIN’ end of the year!

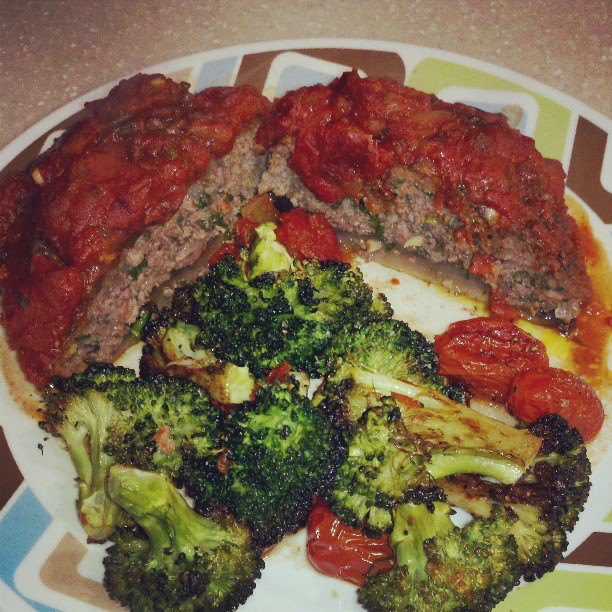
Ok, recipe time! I was originally going to make meatballs, but when the evening rolled around, I just wasn’t feeling it!  Plus, I had some beautiful portobello mushrooms in my fridge, so I decided to stuff them!  Realistically, I got lazy and didn’t want to roll a whole bunch of meatballs….so sue me! Also, this red sauce is killer!  I’m a sucker for good red sauces, but getting good flavor without throwing some red wine in can be difficult….but this one nails it!  I apologize that it just looks like a meat pile in this picture.  I promise there is a mushroom under there!!

stuffed mushrooms

Stuffed Portobello Mushrooms with Red Sauce

For the Stuffed Mushrooms (I made these first, then while they were baking, assembled my sauce):

  • 1 pound ground beef
  • 4 large portobello mushroom caps, stems removed and “gills” (the brown undersides) removed with a spoon…..carefully scrape them out, you don’t want to tear your mushrooms!
  • 2 tablespoons fresh sage, finely chopped
  • 3 tablespoons fresh basil, finely chopped
  • 3 cloves garlic, minced
  • 1/2 small onion, finely diced
  • 1/2 teaspoon salt AND pepper
  • 4 ounces prosciutto, finely chopped (this ingredient isn’t totally necessary, but makes it MUCH more awesome!)
  1. Preheat your oven to 375 degrees.
  2. Combine all ingredients in a large bowl.
  3. Mix the meat up with your hands, gently incorporating all of the seasonings and herbs.  Don’t OVER mix it or it will become tough.
  4. Divide your meat into 4 equal portions and stuff into the cap of each mushroom.  You want to make sure you pack it pretty tightly and in an even, relatively flat layer.
  5. Arrange your stuffed mushrooms in a glass baking dish (you might have to use 2 dishes, depending on the size of your mushrooms)
  6. Bake for 30 minutes.
  7. While these are baking for the first 30 minutes, make your sauce!

For the red sauce:

  • 1 can fire roasted tomatoes (14.5 oz.)
  • 1 small can tomato paste (6 oz.)
  • 1 cup liquid (I used water, but your could use any kind of stock)
  • 5-7 fresh sage leaves, chopped
  • 10-12 fresh basil leaves, chopped
  • 1/2 onion, diced
  • 3 cloves garlic, minced
  • 1/2 teaspoon red pepper flakes
  • 1/2 teaspoon dried oregano
  • salt and pepper to taste
  1. In a medium saucepan, add a tablespoon of olive oil.  When warm, add in your onions and garlic.  Saute until the are softened, about 3-4 minutes.
  2. Add in your fresh herbs, and lightly toss them with the hot oil and veggies.
  3. Dump in your fire roasted tomatoes and your tomato paste.  Stir slowly to combine.  Cook for about 3 minutes, or until the tomato paste starts to loosen up.
  4. Add in your 1 cup of liquid slowly, until you achieve the thickness of sauce you want.  I used the entire cup, and I still ended up with a thick chunky sauce.  It was perfect!
  5. Stir in your dry seasonings and simmer on low until mushrooms are finished with their first 30 minutes of cooking (about 15 minutes).  You will want to slightly cover it so it doesn’t splatter everywhere, and stir every couple of minutes so it doesn’t stick to the bottom of your pan.  That would SUCK!
  6. When mushrooms are done, remove them from the oven.  They WILL NOT be done, so don’t worry if they still look pink!
  7. Spoon sauce over each of the mushrooms.  Use as much as you like.  I didn’t drown mine, in fact, I had almost a cup of sauce leftover (which I put in a jar in the fridge for later)
  8. Put your saucy mushrooms back in the oven for another 20-30 minutes.  Cooking time will depend on how thick the stuffing layer is, how thick your mushrooms are, how much sauce you topped with, etc.  When in doubt, use a meat thermometer to check for “done-ness”.  Or if that is too much for ya, after another 30 minutes of cooking, pull one out…..cut into it, and if it’s still pink, put it back in.  It’s not too terribly hard!
  9. Plate up, and smash!  I served mine with some roasted veggies and it was AMAZING!

These turned out surprisingly well, considering the mushrooms were a last-minute game time decision. I took the leftovers to school today for lunch, and a substitute in the teacher’s lounge was like “I know that ain’t what they are serving in your cafeteria! You make that?”  It made me laugh.  Eat up my friends! Peace, Love, and Paleo!

-Meister