Salmon Patties for a Crazy Weekend

As I type this, there are 5 dozen freshly baked Paleo chocolate chunk cookies sitting on my counter….straight from the oven.  My mouth is literally watering and all I can think about is the smell of those damn cookies!  But on the upside, I haven’t had ANY of them…..so I’m sticking to my Whole30!  Boom.  Those broads at the baby shower tomorrow better eat every single last one of those cookies…..otherwise I’m giving them away.  There is NO way they are coming back into my house!  I’m not sure I could resist any longer….

This weekend was completely insane.  Yesterday was packed full of a great “mystery” workout, a fabulous nutrition seminar, some lunch with a rockin’ crew, then a wedding with a group of people I haven’t seen in WAY too long!  Today, I was up entirely too early and hit the ground running!  For real, I don’t know what it is lately, but I have been sleeping FANTASTICALLY!!  I’m chocking it up to the PurePharma Magnesium/Zinc supplement I started taking.  That shit is legit.  I’m kind of in love with it.  So I was a powerhouse today in terms of getting stuff done.  I cleaned my house, planned meals, mowed the lawn, had dinner at my parents’ house, went grocery shopping, and baked those damned cookies.  I’m tired just re-reading that.  Ugh.

On top of everything, it was abso-freaking-lutely GORGEOUS this weekend!  I opened up my entire house, I wore shorts and flip flops, and I got a little bit of color from mowing the lawn.  Heck yes.  FINALLY! It just better stay this way.  Or I’m going to become a stupid sullen teenager over it.  So yes.  Epic weather, epic weekend, less than epic post.  Sorry friends.

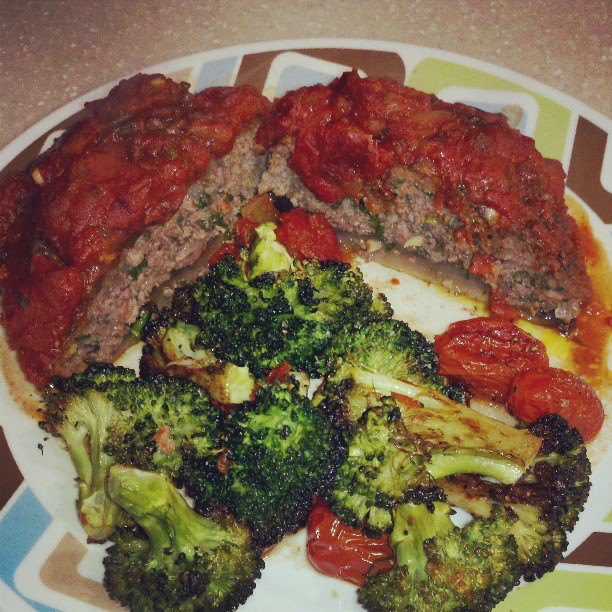
I made these salmon patties a while back and they were pretty awesome.  I got a little worried because they were kind of crumbly before they cooked, but they held together beautifully! Not to mention they were pretty delicious!  Anyways, I made another batch of them to snack on throughout the weekend because I knew it was gonna be crazy, and they got me through like a charm!

salmon patties

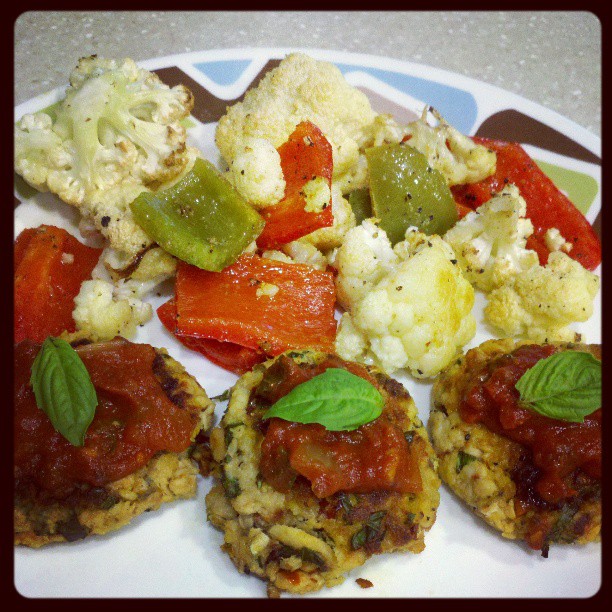
I topped mine with some of my homemade red sauce and served them up with some roasted veggies!

Salmon Patties

  • 2 cans salmon drained, get the higher quality stuff without a bunch of extra junk in it (I know it looks totally gross in the can…..just deal with it quickly and break it up, you can do it!)
  • 1 egg
  • 1 tablespoon coconut flour
  • 2 tablespoons dried minced onion
  • 1 teaspoon garlic powder
  • 1/2 teaspoon salt
  • 1/2 teaspoon pepper
  • 10-15 basil leaves, finely chopped
  • 5 sundried tomatoes, finely chopped
  1. Mix all ingredients together in a bowl. Make sure you incorporate everything well.
  2. In a deep skillet, melt down 2 tablespoons coconut oil.
  3. Form your mixture into patties.  I got 8 out of mine.  You want them to be a little on the thicker side, about 1/2 inch thick so that they don’t fall apart.  When forming your patties, be sure they are tightly packed…..or they will crumble!
  4. Saute your salmon patties in the coconut oil until they get a nice brown crust.  It’s about 3-4 minutes per side.
  5. Plate them up and enjoy!

You can eat these hot, cold, or anywhere in between!  In fact, I ate them all three ways this weekend!  Just make sure you store your leftovers in the fridge!  Here’s to continuing with high productivity and finishing out the first 30 days of my Cancun Challenge strong!!!  Peace, Love, and Paleo!

-Meister

Prosciutto and Sage Chicken Roll Ups

chicken and sage rolls

I’m officially on the downhill slide of my first 30 days of my almost 90 day Cancun challenge!  Honestly, I feel like I’m somewhat over the sugar urges.  I haven’t wanted to smash on sweet stuff in almost a week…..despite having a plate of homemade cupcakes on my kitchen counter!  Now THAT, my friends is willpower!  I just keep looking at them and thinking…..you know you don’t want that, and it won’t even be that satisfying, AND you’ll feel like crap afterwards.  By the time I rationalize all of that, I’m usually good!

Now salt?  That is where my bizarre food cravings are kicking into high gear.  Maybe it’s the fact that my allergies are kicking up because it’s FINALLY maybe starting to really act like spring here!!  But for some reason, I can’t seem to get enough salt!  Everything I make is tasting bland, and I’ve NEVER been someone who reaches for the salt shaker…..weird.  I’m sure I have some sort of imbalance going on inside of me, but whatever, I’m just gonna ride it out for now!

Speaking of the weather finally turning around here…..it was ACTUALLY sunny today!  And somewhat warm!  And as we speak, I’m watching a full-ish moon rising in a CLEAR sky.  Simple pleasures, folks.  I swear, the fact that it was sunny today improved my mood hugely.  By the end of the week, it’s supposed to be almost 70 degrees!  That’s damn near flip flop weather…..which means I need to get it together and go get a pedicure.  Ain’t NOBODY got time for unpolished toes.  For real.

Alright, food for tonight.  My mom used to make these chicken roll ups with prosciutto, sage, and then some sort of cheese.  Then she’d make a wine and mushroom gravy for them……needless to say, they were off the chain!  So I was feeling a hankering for these bad boys.  I just left out the cheese (duh….) and skipped out on a sauce, mostly due to time constraints.  These turned out great!

Prosciutto and Sage Chicken Roll Ups

  • 4 large chicken breasts, pounded out to about 1/2 inch thick
  • 3 oz. prosciutto
  • 1 oz. package of fresh sage……or about 30ish sage leaves (you could use ground sage here, but fresh is much better! If using dry, use between 1/4 and 1/2 teaspoon per roll, depending on how “sage-y” you like it)
  • toothpicks
  • garlic powder, onion powder, salt, pepper, celery salt
  1. Preheat oven to 375 degrees.
  2. Lay out you pounded out chicken breasts and lightly sprinkle the top side with each of the spices….NOT the sage though, save that for later!
  3. Layer 2 slices of prosciutto on each piece of chicken.
  4. Next, evenly arrange your sage leaves (or dried sage) over your prosciutto.
  5. Roll your chicken breasts up with all of the goodies inside and secure with 3-4 toothpicks.  You want to make sure that you roll them tightly and tuck any exposed goodies in on the ends.  Get good and messy with this!
  6. Lightly sprinkle the outside with salt and fresh cracked pepper.
  7. In a deep skillet, melt 1 tablespoon of coconut oil.
  8. Lightly brown the chicken rolls in the coconut oil on all sides. You will want to give them about 2-3 minutes per side.  This might get kind of funky with toothpicks sticking out every which way….just do your best to get as much browning on there as possible!
  9. Once you have browned as much of the outsides as you can, place chicken rolls on a foil lined baking sheet and bake for 10-15 minutes.  This will depend on how thick your chicken rolls are and how long they actually cooked in your skillet.  Use a meat thermometer to check (or do like I did and at 15 minutes, pull one out and cut it in half…..if it’s still pink, keep cooking!)
  10. Remove them from the oven, remove the toothpicks and devour!

I served mine sliced over some sauteed and steamed kale with sundried tomatoes.  It was insanely delicious and took me right back to my Mama’s old favorite! Seriously, the browned chicken breast, the salty slightly bacon-y flavor from the prosciutto, the earthy sage….MMM!!!  So good!  Hope you enjoy them!  They are a total “WOW!” meal as well because they look really pretty….so get after it! Peace, Love, and Paleo!

-Meister

Avocado Pesto

avo pesto

As the weekend draws to a close I need to put two things out there.  First, I’m sorry I haven’t posted until now…I realize it’s been a couple of days.  Things have been a wee bit crazy around here and I chose to support the people in my world instead of blog, my most sincere apologies.  Secondly, I have come to truly value spending time with people who build me up positively.  One of my oldest dearest friends is in town, and seeing her really lifted me up today.

This week is gearing up to be a crazy one!  Two fieldtrips at school means that I need to plan lunches that can be eaten on the go…..which on a Whole30, ends up looking like a bunch of random stuff thrown together.  Seriously, on Tuesday, I’m pretty sure I’m taking a pouch of salmon, a few clementines, some coconut flakes, and some celery and carrots.  It’s all “snack” foods, rolled together to make it count as a meal.  Meh, it happens!

Speaking of my Whole 30/90ish, tomorrow marks day 15!  In the world of a pure Whole30, that’s the halfway mark!  I’m so proud of my girl Ava…..we are sticking with it!  I’m definitely noticing bodily changes, and my incessant cravings for sugar are seeming to dwindle, so I’ll take it!  I even baked a pie, a FREAKING PIE, without tasting a single bit of the batter/mix/filling.  Willpower has returned to me, and boy does it feel good!

Onto food!  This avocado pesto started out as just regular pesto….until I realized I had a couple of avocados lying around that were going to go bad if I didn’t use them.  I figured, hell, they were green too, so what would it hurt to just toss them in?  It didn’t hurt a damn thing.  In fact, in increased the awesomeness of this pesto by about 10 fold!  Enjoy!

Avocado Pesto

  • 3 oz. fresh basil (I used the big, deep container from Trader Joe’s)
  • 1 oz. fresh parsley (again, used the small pack from Trader Joe’s)
  • 3 garlic cloves, peeled and smashed
  • 2 ripe avocados
  • 1/2 teaspoon salt
  • 1/2 teaspoon onion powder
  • Juice of 1 lemon
  • 1/2 cup olive oil, give or take….depending on how thick you like your sauce
  1. In a food processor, add your fresh herbs, garlic cloves, and your salt. Pulse until herbs are chopped down into very small pieces, and the mix is well combined.
  2. Add in your avocados, lemon juice, and spices.  Pulse to smash up the avocados and mix it all together into a green paste.
  3. Stream in your olive oil until you achieve the consistency that you like.  I used right at 1/2 cup of olive oil, but you do whatever brings you joy!
  4. Taste to make sure it is seasoned well.  Don’t fear, the garlic will be pretty sharp at first….it will mellow a bit with time.  But I like the garlicky kick!  Roll with it!
  5. Use it to top spaghetti squash, or chicken, or pan seared pork chops AND spaghetti squash…..like I did!
  6. SMASH!
  7. Store the leftovers in the fridge……and feel free to serve it warm or at room temp.  It’s delish either way!

This is going to become a staple in my kitchen.  I can’t wait to toss some grilled veggies in it once the weather turns around for good!! Peace, Love, and Paleo!

-Meister

Short Ribs with a side of Emotion

Ok guys, I gotta be straight with you.  I’m having a pretty intense reaction to all of the bombing at the Boston Marathon stuff….to the point where I’m not allowing myself to watch the news or turn on any sort of talk radio.  For a good hour this afternoon, I was in complete fight or flight mode, stressing hugely over one of my best friends in the entire world who had been in Boston and had posted some pics of the marathon to Facebook about 3 hours prior to this all going down.  Needless to say, until I heard he was OK, I was a wreck.  Regardless, I’m in a complete state of shock.  The capacity for hate and destruction that some people possess truly terrifies me.  For far too long, I was the kind of person who held grudges, who had a negative outlook, and who saw the darkness in everyone and everything.  The root of this was my own hatred of myself, my place in life, and my body.  I have worked so incredibly hard to NOT be the person that harbors any sort of anger or hatred for anyone or anything, so the events of today have left me completely confused.  Now, I’m not going to make any sort of political statement here, or take any stance….but I AM going to say that I think the root of all of this lies not a gun control issue or a terrorism issue, but a lack of respect and love.  Respect and love for yourself, for each other, for your world, and your future.  Call me simplistic, but that’s where I’m at.  So I’m gonna keep doing what I can to put my positivity out into the world, because God knows there is more than enough hate to go around.

Anyways, other than that, things are going pretty great right now.  I bought my plane ticket for Cancun today!!!  Not gonna lie, I got the jitters when I hit the “book now!” button.  Then immediately had buyer’s remorse…..to which I promptly smacked myself in the forehead and was like “WAKE UP! When are you gonna get to do this?!” So, I’m over that now and have moved on to being SUPER excited!! Had a great day in the gym today….added 20 pounds to my back squat, so there’s that! Plus, I’m over the initial hump of the Whole30 where all I could think about is food.  Because I’ve done this before, I feel like that period was much shorter for me, and now, on Day 8, I’m not thinking/living/breathing/dreaming food!  It is shifting back into a position to fuel me, not just satisfy boredom.  Slowly but surely, I feel like I’m tackling that stupid sugar demon!!  I’m still eating a small amount of fruit each day, but I’m OK with that.  You know what else is great about fruit?  You can add it to savory things and it adds just a hint of sweetness!  Like it did with these….

short ribs

I know it looks like a somewhat gnarly pile of meat….but I swear to you, these were some of the most AMAZING short ribs I’ve ever made!  Plus, they go in the crockpot, so they are SUPER easy to prep, cook, and clean up!  Win all around!

Blackberry Balsamic Short Ribs

  • 3-ish pounds beef short ribs
  • 1 cup balsamic vinegar
  • 1/2 cup water
  • 1 can (6 oz) tomato paste
  • 10-15 large blackberries
  • 5 cloves garlic, smashed
  • 10ish leaves fresh sage, torn into pieces
  • 1/2 teaspoon garlic powder
  • 1/2 teaspoon onion powder
  • 1 teaspoon salt
  • 1/2 teaspoon black pepper
  1. In a deep skillet, melt 1 tablespoon coconut oil.
  2. Sear short ribs in the coconut oil on all sides.  You only need to get a thin crust on the meat, not cook it through, so about 2-3 minutes per side.
  3. In a bowl, mix together vinegar, tomato paste, and water.
  4. When ribs are seared, add them to your crockpot.
  5. Pour liquid mixture over your ribs.
  6. Add spices, torn sage, smashed garlic, and blackberries in around the meat.
  7. Cook on low for 8-10 hours.  I actually cooked mine on low for about 9 hours, then switched it to warm for another 2 (while I was at the gym) and they were great!  Falling off the bone beautifully!
  8. Stuff your face with hearty, rich, savory, meaty goodness!

The best part about this is that I was able to eat and do all of the “cooking” dishes in less than about 35 minutes….which was amazing!  Not to mention, it was nice to have something already cooked when I got home from the gym and my house smells AWESOME!  Sending a whole bunch of love and calming, healing thoughts to all my homies in Boston.  Go love one another.

PEACE. LOVE. and Paleo.

-Meister

Fighting Sugar Demons….

minty temptation

For real.  Sorry if this offends you, it’s truth.

Remember when I talked about those STUPID Lifesavers mints in my desk drawer haunting me?? Yeah, here they are, trying that crap again.  Seriously, every single time I opened this drawer I caught a minty whiff.  It took every bit of willpower I had today NOT to destroy these.  Again, they aren’t even worth it!  If I’m gonna go to sugar town on crappy candy, I’m gonna get after some Hot Tamales…..because THOSE are perfection!

I’m at the successful completion of Day 4 of my Cancun Challenge!  It honestly, food wise, hasn’t been that difficult for me yet.  Yes, I’ve had a couple of random cravings; however, when those pass, I’m good.  I was eating pretty strictly Paleo before I started.  I had completely cut out gluten for over a year, and had cut down on processed junk long ago.  But I have to be honest, the true test will be this weekend.  I always ALWAYS generally do some sort of baking on the weekends.  Not sure what I’m going to do with myself!  Plus, I don’t have family dinner on Sunday to look forward to because my parents left this morning for Maui.  They are jerks.  Flaunting their Hawaiian gear while here in good old O-town, we’ve had every possible form of precipitation in the last 24 hours.  That being said, I’m pretty sure BOTH my folks packed their PaleoMeister shirts, and intend to rock the shit out of them all over that island.  I’m fairly certain there will be photographic evidence of this, and it will likely end up here…..because although they may be jerks, they are FREAKING ADORABLE.  For real, my folks are the greatest!

Guess what else is awesome?!?  I finished my State Testing today!!!  This is HUGE!  So relieved to go back to my regular schedule tomorrow.  Now it’s just 6 glorious weeks until summer break!  On the whole, this year has been amazing so far.  Great coworkers, great building, and GREAT kids.  Gonna really miss some of the 8th graders as they go on to high school….but until that day comes, I’m hoping for a ROCKIN’ end of the year!

Ok, recipe time! I was originally going to make meatballs, but when the evening rolled around, I just wasn’t feeling it!  Plus, I had some beautiful portobello mushrooms in my fridge, so I decided to stuff them!  Realistically, I got lazy and didn’t want to roll a whole bunch of meatballs….so sue me! Also, this red sauce is killer!  I’m a sucker for good red sauces, but getting good flavor without throwing some red wine in can be difficult….but this one nails it!  I apologize that it just looks like a meat pile in this picture.  I promise there is a mushroom under there!!

stuffed mushrooms

Stuffed Portobello Mushrooms with Red Sauce

For the Stuffed Mushrooms (I made these first, then while they were baking, assembled my sauce):

  • 1 pound ground beef
  • 4 large portobello mushroom caps, stems removed and “gills” (the brown undersides) removed with a spoon…..carefully scrape them out, you don’t want to tear your mushrooms!
  • 2 tablespoons fresh sage, finely chopped
  • 3 tablespoons fresh basil, finely chopped
  • 3 cloves garlic, minced
  • 1/2 small onion, finely diced
  • 1/2 teaspoon salt AND pepper
  • 4 ounces prosciutto, finely chopped (this ingredient isn’t totally necessary, but makes it MUCH more awesome!)
  1. Preheat your oven to 375 degrees.
  2. Combine all ingredients in a large bowl.
  3. Mix the meat up with your hands, gently incorporating all of the seasonings and herbs.  Don’t OVER mix it or it will become tough.
  4. Divide your meat into 4 equal portions and stuff into the cap of each mushroom.  You want to make sure you pack it pretty tightly and in an even, relatively flat layer.
  5. Arrange your stuffed mushrooms in a glass baking dish (you might have to use 2 dishes, depending on the size of your mushrooms)
  6. Bake for 30 minutes.
  7. While these are baking for the first 30 minutes, make your sauce!

For the red sauce:

  • 1 can fire roasted tomatoes (14.5 oz.)
  • 1 small can tomato paste (6 oz.)
  • 1 cup liquid (I used water, but your could use any kind of stock)
  • 5-7 fresh sage leaves, chopped
  • 10-12 fresh basil leaves, chopped
  • 1/2 onion, diced
  • 3 cloves garlic, minced
  • 1/2 teaspoon red pepper flakes
  • 1/2 teaspoon dried oregano
  • salt and pepper to taste
  1. In a medium saucepan, add a tablespoon of olive oil.  When warm, add in your onions and garlic.  Saute until the are softened, about 3-4 minutes.
  2. Add in your fresh herbs, and lightly toss them with the hot oil and veggies.
  3. Dump in your fire roasted tomatoes and your tomato paste.  Stir slowly to combine.  Cook for about 3 minutes, or until the tomato paste starts to loosen up.
  4. Add in your 1 cup of liquid slowly, until you achieve the thickness of sauce you want.  I used the entire cup, and I still ended up with a thick chunky sauce.  It was perfect!
  5. Stir in your dry seasonings and simmer on low until mushrooms are finished with their first 30 minutes of cooking (about 15 minutes).  You will want to slightly cover it so it doesn’t splatter everywhere, and stir every couple of minutes so it doesn’t stick to the bottom of your pan.  That would SUCK!
  6. When mushrooms are done, remove them from the oven.  They WILL NOT be done, so don’t worry if they still look pink!
  7. Spoon sauce over each of the mushrooms.  Use as much as you like.  I didn’t drown mine, in fact, I had almost a cup of sauce leftover (which I put in a jar in the fridge for later)
  8. Put your saucy mushrooms back in the oven for another 20-30 minutes.  Cooking time will depend on how thick the stuffing layer is, how thick your mushrooms are, how much sauce you topped with, etc.  When in doubt, use a meat thermometer to check for “done-ness”.  Or if that is too much for ya, after another 30 minutes of cooking, pull one out…..cut into it, and if it’s still pink, put it back in.  It’s not too terribly hard!
  9. Plate up, and smash!  I served mine with some roasted veggies and it was AMAZING!

These turned out surprisingly well, considering the mushrooms were a last-minute game time decision. I took the leftovers to school today for lunch, and a substitute in the teacher’s lounge was like “I know that ain’t what they are serving in your cafeteria! You make that?”  It made me laugh.  Eat up my friends! Peace, Love, and Paleo!

-Meister

Day 1, on the books!

cilantro lime shrimp

Before I jump into recipe talk, I need to come clean and be brutally honest….I had a LEGITIMATE stare down with some lifesaver mints today in my classroom.  It was beyond stupid!  I’m not even joking when I say that: A. those mints kind of suck B.  I would have eaten one out of boredom, and just because I “couldn’t” have it and C. one of my students TOTALLY called me out on it.  Like I said, it was ridiculous.  This is exactly what happened the last time I did a Whole30.  I started getting random MENTAL cravings for things I don’t even usually eat; however, simply because it’s on the “no list” I instantly want it.  Noooo, I don’t have ANY emotional issues with food.  Clearly not!

Whatever, now that that’s out….today was just a total Monday.  In every sense of the word.  I put myself on autopilot and just went through the day.  Eh, those have to happen every once in a while I suppose.  On the UP side, I should be done with my State Testing this week!!  That will get a huge weight off of my shoulders.  It also means that I get to go back to real life, and better yet, REAL teaching!  Whaaaaat?  For real.  Giving tests is really, REALLY difficult and it sucks the life out of you.  I teach middle school for a variety of reasons, one of which is the amount of energy that I get from my kids.  That just doesn’t happen during testing time because of the serious environment.  Much like sunshine, good food, and excellent music, I need adolescent energy.  I’m weird.  Deal with it.

On to food!  I sat last night looking in my freezer thinking, “hmm…..shrimp?”  So I went with it!  My mom makes this Chinese coleslaw that has crushed up Ramen noodles in it.  She makes it for every summer party she goes to.  I hate it.  In fact, I hate raw cabbage in coleslaw form.  One of my friends describes it as wet grass and I couldn’t agree more…..that was until I had myself some Napa cabbage!  That shit is BOMB!  It’s also about the only cabbage I can stand in coleslaw form.  So, the slaw portion of my dinner was inspired by my wonderful Ma, and her super popular (though hated by me because I’m a jerk like that) coleslaw.  The shrimp was kind of an after thought.  I knew I wanted something spicy and green and fresh.  Plus, I’m totally in love with fresh cilantro right now….so that’s how this shrimp came to be!  Not to mention limes make me think of cocktails, which makes me think of summer…..which I want, NOW.  Here goes!

napa slaw

Napa Cabbage Slaw

  • 1 head of Napa cabbage, shredded (it’s a much more delicate leaf, both texture and flavor….or get regular cabbage if you dig it.  I don’t, not raw at least!)
  • 1 small red onion, thinly sliced
  • 1-2 jalapeno peppers, diced finely
  • 1 bunch (8-10) scallions, chopped up….both white and greens
  • 1/2 cup sliced almonds
  • 1/4 cup apple cider vinegar
  • 1/4 cup coconut aminos (you could use tamari or GF soy sauce…but I’m staying strict to no soy)
  • 1/2 cup olive oil
  • 1 teaspoon garlic powder
  • 1 teaspoon onion powder
  • 1/2 teaspoon dried cilantro
  • 1 teaspoon salt
  • Juice of 1 lime
  1. In a large bowl, combine the cabbage, onion, peppers, and scallions in a large bowl.
  2. In a jar (or something else you can shake up dressing in) combine your vinegar, coconut aminos, olive oil, lime juice, and all spices.  Cap the jar and shake the SHIT out of it.  I happened to dance around to Whitney Houston in my kitchen while preparing this.  It helped, trust me.
  3. Pour about half of the dressing over the cabbage and toss well to coat it.
  4. Let it sit in the fridge for about 10-15 minutes to blend flavors and such.  Top it with the sliced almonds and serve!  Top with more dressing if you like yours saucy-er!  Or better yet!  Top it with this shrimp!

Spicy Cilantro Lime Shrimp

  • 1-1.5 pounds of medium sized raw shrimp, peeled, de-veined , and tails off
  • 2 bunches of scallions, white and greens, cut into 2 inch pieces
  • 2 serrano peppers, thinly sliced into rounds (these little guys can get HOT, so if you don’t get down like that, sub out jalapenos, or no peppers!)
  • 1 bunch fresh cilantro
  • Juice of 2 limes
  • 1 teaspoon garlic powder
  • 1 teaspoon onion powder
  • 1 teaspoon dried cilantro
  • 1 tablespoon coconut oil
  1. In a deep skillet, melt your coconut oil.
  2. When heated, add your shrimp in a single layer.  Season the shrimp with half of the seasoning mixture. Cook for 2-3 minutes or until shrimp start to turn pink and curl up a bit.
  3. Flip shrimp and season with the remaining seasonings, it’ll form almost a crust on the shrimp.  Cook for another 2 minutes on this side.
  4. When shrimp is ALMOST cooked through, push it to the sides of the pan.  In the center, add your scallions and peppers.  Saute them for 2-3 minutes.
  5. Toss the shrimp and the veggies together to finish cooking.  Add in your lime juice and toss in your fresh cilantro.  Stir for about 1 minute to heat them through and coat your mixture in the juice.
  6. Devour.  For real.  I’m surprised I was able to snap a picture before scarfing mine down…..let alone exercise enough self control to pack up leftovers!

Here’s to freaking delicious food, kitchen dancing, the light at the end of the tunnel, and day 1 of Operation Cancun in the books!  I dare some stupid Lifesaver Mint to tempt me tomorrow….ain’t nobody got time for that! Peace, Love, and Paleo!

-Meister

Post-Travel Blues and Island Pork Stew

Hey y’all!  Coming to you live…….from my kitchen!  Back from PaleoFX in Austin, TX and holy crap, I can’t say how much I love the Paleo/Primal community.  It was incredibly amazing to spend a long weekend with such an amazing network of scientists and foodies that were all there to enjoy, learn, and spread the same message.  This is definitely an event I will go to again in the future.  I TOTALLY geeked out in some sessions, lived out a couple of  fan girl moments, and met a lot of really, really AWESOMELY paleo peeps.  Check this out!! That’s RIGHT!  I met George, the Civilized Caveman and Juli B. from PaleOMG!  For REAL!!  I almost couldn’t make conversation…..I was a completely stupid mix of first date jitters and 14 year old girl at a Bieber concert.  Major thanks to my girl, Missy, for putting her foot down and making me go say “Thanks for being so awesome!!” to these two.

bloggers

And immediately following this, I had enough guts to go personally thank Sarah Fragoso for doing what she does.  For those that don’t know, it was her book, Everyday Paleo, that I creeped through on my coworker’s desk.  SHE is one of the major reasons I’m living a Paleo life today.  She has been, is now, and will continue to be an inspiration to me.  Needless to say, I’m pretty sure we both got a bit choked up when we were talking…

Me and Fragoso

Austin solidified itself as a magical place in my heart.  It had already been one awesome place to visit, but this weekend just confirmed it!  To the point of me job searching teaching positions in the area, no joke.  In addition to the Paleo goodness, I had the opportunity to reconnect with some incredibly amazing friends.  Seriously, those folks and that town really really vibe with me.  Sitting out on patios, drinking ridiculous cocktails, listening to live music, and discussing the world……It was a little piece of heaven!  I sat in the Austin airport last night really bumming hard about coming home…..more specifically, coming back to real life.  I wish I could just suspend the feeling from the weekend and make it last forever!

Anyways, enough whining about leaving the great state of Texas…..I’ll be back there soon enough!  This recipe is one that I made quite a while ago, but talking to a friend made me remember it!  His own words were, “I love pork, I love pineapple, I love stew!  Check, check, CHECK!  I’m all over it!”  I mean, it is pretty amazing.  So amazing in fact, I’m playing with a variation of it for tomorrow night!  Here is the original!

island pork stew

Island Pork Stew…..in the Crockpot

  • 6 carrots, cut into chunks
  • 6 celery stalks, cut into chunks
  • 1 large onion, cut into chunks
  • 6 cloves garlic, smashed
  • 1 cup fresh pineapple, chunked
  • 1/4 cup apple cider vinegar
  • 4 tablespoons tahini (or you could use sunbutter)
  • 3 tablespoons coconut oil (NOT melted)
  • 1-2 pounds pork (cutlets or boneless chops) cut into large chunks
  • 2 inches fresh ginger, peeled and grated or cut into very small pieces
  • 1 teaspoon red pepper flakes
  • 1/4 teaspoon cayenne pepper (more if you want it spicy!)
  • Salt and Pepper to taste
  1. Chop and layer all veggies into the bottom of the crockpot.
  2. Dump pineapple and ginger in on top of your veggies.
  3. Layer your pork (trimmed of fat, if that’s your thing….or not!) on top to cover your veggies.  You want to make a pretty even layer of pork.
  4. In a small bowl, mix together your tahini, coconut oil, and spices into a paste.
  5. Smear that delicious goodness all over the top of the pork!!  Get messy with it.
  6. Pour your vinegar over the top of the pork.
  7. Set your crockpot to low for 6-8 hours.
  8. When all is bubbly and hot, stir with a large spoon to mix everything up and break down your pork further.
  9. Bowl it up and top with fresh chopped cilantro and scallions!  Or hell, top it with whatever you dig.  Anyway you top it, it’s gonna be freaking delicious!

*** If you are into WICKED hot stuff, toss in a habanero pepper.  Keep it whole and remove it prior to serving.  If you really REALLY like to live on the edge, make a couple of slits in that bad boy with a sharp knife to let more of the oils out into the crockpot while cooking.  Again, don’t say I didn’t warn you, but sometimes, you just gotta get SPICY!  You know I’m right.***

With that, friends, I need to go clean up my disaster of a kitchen and think about going to bed at some point.  Sending much Paleo love from a very VERY full heart……Peace, Love, and Paleo.

-Meister

Chicken Marsala….ish

Well, I’m officially on Spring Break!!  This year is kind of a bizarre year for me, as I’m going no where for the break.  A year ago, I was in Texas.  I believe I was in Austin at this point, doing shots of Fireball with my cousin and one of my best buddies in the whole wide world, working off the emotional and physical hangover of being in Houston for St. Patties Day.  This year, nothing.  My St. Patties Day consisted of going to the gym, doing some rowing, cheering on folks doing their 13.2, then sitting around and shooting the breeze with my gym homies while drinking margaritas.  Seriously, have I mentioned that I completely love that bunch?  Because I do.

So this year, my Spring Break is packed full of couch sitting, book reading, cooking when I feel like it, and beautifying myself!  I literally have an appointment every single day….so NEXT week when I hit up Austin, TX for the PaleoFX conference, I’ll be even more smokin’ hot that usual!  I can’t freaking wait for that!!!  I’m going to be such a stupid fan girl about the entire experience….ugh.  I can see it now….

Confession time:  I’ve been eating a TON of sugar lately.  I’m blaming it on hormones.  In all seriousness though, in the last 5 days, I’ve made 2 batches of that avocado chocolate pudding…..and a chocolate hazelnut pie (that I PROMISE I’ll post here when I make one that sticks around long enough to be photographed…) and ALL of it is gone.  In my defense, I shared the pie with the gym and my parents, but STILL!!  Get a GRIP Meister!  Damn.  I just bought 2 legit bikinis…which is an entirely foreign concept for me, and all I can think about is freaking sugar…..when I should be thinking “2 piece, 2 piece, 2 piece…..”  Whatever.

I made this chicken Marsala tonight.  Actually, there is not REAL Marsala wine in it, but heck, it’s essentially the same thing.  No big deal.  It’s so good.  Anytime onions and mushrooms can get all caramelized and delicious together, count me IN!  Not to mention, it includes some ghee….which is a new love of mine.

chicken marsala

Chicken Marsala

  • 4-5 chicken breasts, pounded thin (1/2 to 3/4″ thickness)
  • 1 pound mushrooms, sliced (use whatever variety floats your boat)
  • 2 medium yellow onions, sliced
  • 4-5 cloves garlic, minced
  • 5-6 sprigs fresh thyme, leaves stripped off the stems
  • 1/2 teaspoon dried oregano
  • salt and pepper to taste
  • 2 tablespoons olive oil
  • 2 tablespoons ghee (or grassfed butter, or leave it out if delicious butter flavor isn’t your thing)
  1. Pound out your chicken breasts so that they are thin, 1/2 to 3/4″ thick.  Lightly salt and pepper both sides.
  2. In a large skillet, add 1 tablespoon of olive oil and 1 tablespoon of ghee and let it warm up.
  3. Place chicken in your skillet.  You may have to do this in 2 batches depending on how big your chicken ended up getting.  Cook 2-3 minutes on each side.  This should cook it almost all the way through since you pounded it out so thin!
  4. After chicken is cooked/browned on both sides, remove from pan.
  5. Add the additional olive oil and ghee to your pan, let melt.
  6. Toss in onions and begin to saute, 3-5 minutes.
  7. When they start to soften up, add in your mushrooms.
  8. Let onions and mushrooms cook together until they reduce down in size and begin to caramelize.  This may take 15-20 minutes.  It’s WORTH IT!
  9. When the are all caramelized goodness, or when you hit 20 minutes in on it, add in your garlic and your herbs.  Stir it all in to combine and cook for another 5 minutes.
  10. Add back in your chicken and cover it with the onion and shroom mixture.
  11. Cover and cook on low for an addition 5 minutes or so or until you are ready to serve.
  12. Plate it up and ENJOY!!  I served mine over baby spinach leaves.  They got all wilty and delicious when I topped them with the steaming chicken and veggie goodness!

I’ve got tons of yummy leftovers from that one!  Can’t wait to get after them later in the week!  I’m terrible at planning meals during breaks, so it’ll be nice to have an actual meal rather than throwing together some lunchmeat, a sweet potato, and some nuts.  Typical.  Just like snow days….Anyways, back to rendering bacon fat!  Sending delicious Marsala love! Peace, Love, and Paleo.

-Meister

Wishing for SPRING!!!

Ok, so I know I’ve been complaining a bit about being OVER winter, well apparently, nature decided to bitch slap us one last time this past Sunday.  It got all sorts of crazy with snow and wind and even some ice!  It seemed like it came out of nowhere!  I mean, maybe the news people were talking about it, but I’ve been making it a habit to NOT watch the regular news.  It bums me out, big time!  I usually just watch the Daily Show and the Colbert Report during that time slot instead.  Much much more entertaining!  Anyways, the crazy weather granted us one last snow day.  Don’t get me wrong, I enjoyed not working on Monday, but I feel like it has done nothing but put me a day behind with everything.  As we speak, I’m staring at a pile of student work folders that needs to be graded, and I can’t quite find time in the day to get all of it done!  I’m completely kicking myself for letting things pile up…..UGH!  WHEN WILL I LEARN!??!?  Meh, only two more days of teaching then spring break!!  I am going no where, I’m doing nothing, and I couldn’t be more excited!

Needless to say, I’m really really itching for actual spring to show up.  I’ve been already getting the craving for grilled food, I’ve been naturally not feeling the heavy comfort “winter” type foods as much, and I’m LOVING the fact that it is still really light out when I leave the gym in the evening!  Best feeling EVER!!  The only thing that sucks about it is that I can’t seem to fall asleep at a reasonable hour, so I’ve been hitting the Natural Calm pretty hardcore.  Oh well, I suppose it’s something I should take regularly anyway….it IS helping me get much more restful sleep.  Which I guess would be a great thing to have ALL the time!  Yes, I shall continue with this routine.  It’s better for everyone involved.

In the spirit of spring coming, I decided to make this AMAZING chicken stew with lots and LOTS of green herbs, peppers, and veg in it.  Hence the name “Green Chicken Stew”.  No, the chicken is not green….that would be extremely bad and makes my guts hurt just thinking about it!  GROSS!  This stew is hearty, yet pretty light.  It’s very citrus-y and bright tasting, and I can’t get over how freaking awesome it turned out!  Naturally I garnished it with green things as well…..duh, I want spring folks, and I’m doing anything I can to con myself into it coming (including refusing to wear a real coat anymore…..seriously, I’m done).  Here it is!  Enjoy!!

Green Chicken Stew

Green Chicken Stew

  • 1 pound chicken, diced (used thigh meat, but you could cut up any chicken you dig)
  • 10-12 tomatillos, husks removed and quartered
  • 2 poblano peppers, diced
  • 4 Anaheim peppers, diced
  • 1 jalapeno, diced very fine
  • 1 medium onion, diced
  • 4 cloves garlic, minced
  • 1 quart stock (I used veggie stock, because that’s what I had, chicken stock would rock too)
  • 1 teaspoon cumin
  • Salt and pepper to taste
  • 2 limes (more if you want to top it with lime)
  • Fresh cilantro and avocado (for garnish)
  1. In a soup pot/dutch oven, heat 1 tablespoon of coconut oil.  When oil is melted add your tomatillos.  Saute until they are soft, about 5 minutes.
  2. Remove tomatillos from the pot and put them in either a food processor or blender…..don’t blend yet or they will shoot everywhere!  Wait till they cool a bit, trust me.
  3. In your pot, add a bit more oil (if needed) and toss in your peppers, onion, and garlic.  Saute for 5-7 minutes or until your onions become a bit translucent.  Remove them from your pot and put in a bowl.
  4. Add your chicken to the pot and brown a bit on all sides.  Don’t sweat it if your chicken doesn’t cook all the way through, it’ll have plenty of time to simmer.  While your chicken is browning, season it with some salt and pepper.
  5. When chicken is browned, add back in your peppers and onions.  Blend your tomatillos until pretty much smooth and add that to your pot.  Stir to combine.
  6. Add in your cumin and squeeze the juice of your 2 limes into the pot.
  7. Stir everything together and add in your stock.  I would add enough to make the soup to the thickness you like.  If you want more of a stew, add less liquid….if soup is more your style, add a little more.
  8. Let that bad boy simmer for about 20 minutes.
  9. Bowl it up, top it with some avocado, some fresh cilantro, and a squeeze of lime and ENJOY!!

I hope you enjoy smashing on this soup.  I have a container in my freezer and two more in my fridge!  It’s so lime-y and delicious and just screams for spring!!  Sending you tons of fresh spring love!

-Meister

Lazy + Cold = Easy Dinner 2fer

burrito bowl

So, I’m currently typing this with gloves on….no joke.  They are purple and pink, and have princess crowns on them.  Pretty sure my parents gave them to me as a gag gift stocking stuffer a couple of years ago.  My hands are SO FREAKING cold!!!  Actually, all of me is cold, and I can’t seem to get warm.  Tonight is definitely going to be a night where I sleep in long pants and long sleeves……which is EXTREMELY rare for me and probably means I’m dying.  And as far as the gloves go, well, they were closest thing at hand (no pun intended).  They were already out, since little brother wore them to shovel the driveway  when it snowed last.  He’s secure in himself and will rock some sweet princess gloves whenever he feels like it.

Speaking of little brother, he made the comment that I need to work on my food photos.  Duh.  I know this.  I never claimed to be a food photographer.  In fact, much of what you see on this page is pics that I snap of my food immediately prior to me stuffing my face with it!  Which also accounts for some ridiculously sized portions….don’t judge.  Sometimes, a girl just needs to smash.  Got it?  But nevertheless, my most sincere apologize for my crappy food pics.  I’ll work on it….eventually.  Promise!

The recipes I’m posting tonight are kind of a “choose your own adventure” dinner.  I started off by being super lazy and making the chicken in the crockpot, with the intention of making tacos.  Then I got home Monday night, said screw it, and cooked up some cauliflower rice….and BOOM!  The burrito bowl was born.  Skip to tonight were I was feeling lazy again….so I stuffed the leftovers into peppers and just popped them in the oven.  Easy eats are the tastiest kind!!  So here they are.  Eat them all together, make them separately, do whatever your heart desires! Just get down with your paleo self.

stuffed peppers

Crockpot Spicy Pulled Chicken

  • 2 pounds frozen chicken (I used all breast meat, but you could use thighs as well, or a combo)
  • 2 cups prepared salsa (use a brand without a bunch of extra crap in it, or make your own….choose your heat level to suit your tastes)
  • 2 small cans diced green chiles (do not drain these!)
  • 1 jalapeno, seeds and ribs removed, diced
  • 1 tablespoon chili powder
  • 1 teaspoon cumin
  • 1 teaspoon dried cilantro
  • 1 teaspoon onion powder
  • 1 teaspoon garlic powder
  1. Place frozen chicken in crockpot.
  2. Cover chicken with all remaining ingredients.
  3. Set your crockpot to LOW and cook for 8 hours. Mine went for 8 hours, then I had little brother turn it to WARM when he got home….and it was on that setting for another 2 hours.
  4. Shred chicken with a fork!

Cilantro Lime Cauliflower Rice

  • 2 smallish heads of cauliflower
  • 1 small yellow onion, diced
  • 4 cloves garlic, minced
  • 1 bunch fresh cilantro
  • 2 limes
  • Salt to taste
  1. Using the chopping blade on a food processor (or you could grate it by hand, but that would SUCK hardcore) in small batches, add your cauliflower and pulse it until it looks like grains of rice.  I had to do this in about 4 batches.  No worries. I just dumped it all into a big bowl until I had pulverized all of it!
  2. In a deep skillet, heat 2 tablespoons of coconut oil over medium high heat.
  3. Saute onions and garlic until they begin to get a bit of color and start to soften….about 5 minutes.
  4. Add in your “rice” and stir it around in the onions, garlic, and oil.  It’s cool if your pan seems over-loaded, it actually helps to create some steam.  Continue to stir it every couple of minutes until the rice begins to soften up a bit and gets to a texture that you like for cooked rice.  Mine went for about 7 minutes or so.
  5. Squeeze the juice of your limes over your rice and toss in the chopped cilantro.  Continue to cook with these ingredients for another 5 minutes.
  6. EAT!

To make the burrito bowl:

  1. Serve up some rice in a bowl.
  2. Top it with some of your chicken.
  3. For toppings, I added some more salsa, some chopped lettuce, some Sriracha, some cilantro, and some avocado…DUH.
  4. Mix it all up until it’s just a mess of delicious food and SMASH!  Relish in how awesome your cooking abilities are, and how that “chain restaurant” that offers a similar burrito bowl, ain’t got NOTHING on you!

To make the stuffed peppers:

  1. Preheat your oven to 375 degrees.
  2. Cut the tops off of 4 green peppers, and pull out all seeds and ribs, but leaving the pepper in tact as a cup.
  3. Stuff each pepper about half way full of your leftover rice.
  4. Top each pepper with your leftover pulled chicken.
  5. Arrange in a glass baking dish.
  6. Put about 1/2 inch of water in the bottom of your dish to create some steam while cooking.
  7. Bake for 30-35 minutes (or until peppers are cooked to desired done-ness….I like mine on the crunchier side, so I actually pull mine out at about 25 minutes)
  8. Top with whatever toppings you choose!  I used the same ones I topped my burrito bowls with.

Hopefully this gives some options to play around with!  It was all STUPIDLY easy, and aided in my general laziness.  Tomorrow I’m going to get all sorts of crazy and wrap some brussels sprouts in bacon….so you just wait!  Sending warm, princess glove, chamomile tea drinking love your way!

-Meister